

Basement Insulation Detail

Basement Wall Insulation
Lately I’ve been swamped with questions about insulating basement walls properly. So I’ve written this article to share with you a Basement Insulation detail that I hope will clarify some issues.

Basement Wall Insulation Detail
Moisture Problems
Before you choose an insulation method for your basement it’s important to understand the moisture problems associated with basements. Whether your foundation walls are concrete or masonry the moisture problems are really the same.
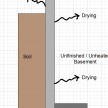
Concrete and masonry walls have a significant amount of moisture (water) contained within the material. The moisture will be present in the foundation materials for years and will never fully dry out. The foundation wall will go through drying cycles over time. The upper portion of the wall will dry to the outside and inside while the lower portion will dry to the inside of the house.
The drying cycle releases moisture which can get trapped in adjacent materials causing moisture problems such as mold, mildew and rotting. Knowing that this cycle will continue year after year it’s important to choose an insulation detail that prevents that drying moisture from entering vulnerable materials such as wood framing, fiberglass insulation, drywall and other moisture sensitive materials.
We also need to prevent water vapor from the finished space from coming in contact with the cold foundation walls and forming condensation. Unlike traditional walls where we have vapor barriers on the outside and inside foundation walls present some challenges. In the proposed basement wall insulation detail we’ll provide a moisture/insulation barrier along the face of the foundation wall and then a vapor barrier on the warm side of the framing of the basement walls.
Insulation Detail – Insulating Basement Walls
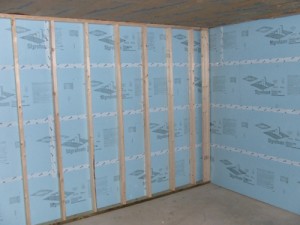
The insulation detail shown in the figure is a detail that I’ve used several times with great success. This detail is my preferred method for insulating basement walls short of having the walls sprayed with foam. There are several variations of this detail that can be used to achieve the same result.
- Install rigid expanded polystyrene insulation from the slab up to the top of concrete (masonry) wall. Install the same insulation along the top of the exposed foundation wall and then up along the rim joist to the bottom of the sub-floor.
- The vertical expanded polystyrene insulation can be attached to the wall with a multi-purpose adhesive designed for foam. The top portions along the top of wall and rim joist can be installed using spray foam such as “Great Stuff”.
- Be sure to seal ALL the joints in the foam with tape. The best tape I’ve found for adhering to foam board is Tyvek tape.
- Frame a wall in front of the expanded polystyrene insulation. The wall can be as simple as strapping shot through the foam into the concrete or a traditional framed wall. If you frame a wall I recommend you install a piece of 1x composite decking below the bottom plate. This will prevent moisture from wicking up into the framing and finished wall.
- Optional – Install insulation in the stud cavities. Depending on the thickness of the foam you can save some money and supplement insulation in the stud cavities, it’s fine to use fiberglass or cellulose in this step. See Insulating A Basement with Cellulose and Basement Storage Room for more details.
- Install a vapor barrier. Either use faced insulation in the wall cavity or install a vapor barrier (if you use Spray-In-Place Cellulose Insulation you may omit the vapor barrier).
- Be sure to leave a minimum 1/2″ gap between the slab and finished wall board.
Once you’ve effectively sealed off the drying cycle from entering the house side the drying cycle will have to happen to the portion of the wall above grade on the outside. As i said there are several alternative approaches to this method that will work. The key is to cut off drying moisture from the foundation wall and prevent it from entering the finished wall cavity.


When you put the foam up against the concrete wall, where does the moisture go then? Wouldn’t it get trapped in the tiny space between the foam and the concrete? I am going to be finishing my basement in a year or two and the old (1928) walls do sweat quite a bit and I don’t want to get a layer of mold growing between the foam and the cement.
Thanks!
The whole process is quite complicated. However, by sealing the inside you force the moisture/drying to occur out the top of the wall on the outside of the house where the concrete is exposed to the outside air.
Secondly, mold will only grow in a place that has moisture, air and a food source. Mold likes things such as wood, paper, fiberglass, drywall, etc.
Would it then be wise, in the winter months, to keep snow away from the exterior exposed concrete?
Also, a bit more unrelated to insulation; I am most likely going to use Delta-FL (or a similar product) on my slab before carpeting. Would you recommend building the walls on top of the material, or install the material after building the walls?
Thanks again!
Actually snow is an amazing insulator if you can believe it. Snow up against a foundation will certainly help insulate it. Unfortunately, when spring comes that water can be an issue.
I’m not familiar with Delta-FL, however, I wouldn’t install that under the walls. I’d install a piece of composite decking under the bottom plate and install the sub-floor up to the wall.
What size of the composite decking would you install under the bottom
Plate?
The width of the framing.
Very helpful, Todd. Thanks.
I have a step-son living in my 58 year old basement (tenporarily) and the area was cold. I saw your article about insulating basement walls and really picked up on it. I used 1″ DOW blueboard and used only 8 pieces around a corner during the winter. When spring comes I will complete the project with continued styrofoam and stud wall contruction. It has been absoulutely amazing the difference in that corner of the basement. I have no moisture problem but the difference in wall temperature is about 30 degrees between styrofoam and naked wall. I can see this is a very good way to take care of the coldness of a basement. Thanks for the info. Sincerely Mikey in MO.
@ Mikey – Glad it’s working out for you. Be careful with bedrooms in basements. Be sure you have proper egress for emergency escape. Each year there are tragic deaths for people living in basements that get trapped in a fire.
shouldnt he have used open cell white styrofoam instead of closed cell blue board
No way! Open cell foam insulation is a disaster in basements and any place that is prone to moisture problems. Frankly I’d NEVER put open cell in any house. The only people using it are folks trying to cut costs.
I am thinking of using 4X8X1″ sheets of insulation and just covering the top 4′ of the wall. My thought is that the wall would be covered to bottom of frost line. Will this work? I would then fill in between the joists with blanket insulation.
@ Ken – The problem with that is the lower half of the wall will still be very cold and very damp. The blanket insulation will then collect moisture and it won’t be long before mold starts. Sorry to say but you really need to insulate the full height of that wall with foam.
Todd, Good easy to follow info. I have 8″x9′ poured walls. The cavity between the floor joists (lengthwise) and the outside wall on the sill plate of the house is very restricted, making it almost impossible to insert insulation board in that cavity. I intend on using 4’x8’x2″ sheets of Extruded Polystyrene Insulation. I have planned on attaching the sheets of insulation so they are even with the top of the concrete wall, leaving the wall below the sheet to the floor (approx. 1′) uninsulated. I would then have a contractor spray foam the sill plate cavities overlaping the sheets of polystyrene already attached to the walls. Is this a viable option? If it is can you identify some pro’s, con’s and concerns. Thanks.
@ Chuck – Sounds like a great plan. I do have one question though, why are you leaving the bottom 1′ open? Why not cut a piece to fit that as well and seal the seams? Are you planning on finishing the basement?
Todd, Thanks. I was unsure if the benefit from adding insulation at that depth would justify the additional expense. If so, it may be as well to attach the sheets from the floor up and then have the contractor spray from the rim joist cavities down the extra foot or so overlaping the sheets of polystyrene at that point. How much foam would you suggest in the rim joists and sill plate area? I plan on 2’x4′ walls with 1/2″ mold and mildew resistant drywall (Paperless ?) all the way around. I was going to leave about a 1 1/2″ airgap between the polystyrene and the wall without additional insulation. I used the Zip Code Insulation Program Worksheet you suggested (www.ornl.gov/~roofs/Zip/ZipHome.html) and I think that with the airgap I get the R-11 the Program recommends. The addition of wet cellulose spray insulation in the 2″x4″ walls maybe overkill since I’m using the 2″ sheets of Extruded Polystyrene. If I’m unhappy with the results, can I blow in cellulose from the top later without increasing the concern of mold or mildew? Thanks again.
@ Chuck – I think you’ve got a great plan. 2″ of foam board will do a great job and I think it will work well. You can always install cellulose later and it comes with a mold inhibitor in it.
Todd, Thanks for your comments. Is there a particular brand adhesive you recommend? How much adhesive do I need to use per sheet? Is there a pattern you suggest? How many sheets will one tube of adhesive cover? Thanks.
@ Chuck – Most hardware stores carry an adhesive (in a tube similar to caulking) that’s rated for foam board. Be sure to read the label and find one that’s made for foam. There’s no special way to do this and it really doesn’t take much. However, you’ll probably have to temporarily prop something up against the foam until the adhesive cures. Once it’s cured it typically works very well.
Todd,
Quick question. When installing polysterene foam do you also cover the sill board? The reason being on the face of my sill board are attached electrical wiring. I would think it would be a bad idea to put foam over the electric. I plan to caulk between the sill plate and foundation and was thinking of maybe adding some fiberglass insulation instead. My sill plate is 2 (2 X 4)’s. I am also planning on putting foam on the rim joist and top of the cinder block wall. Any assistance would be greatly appreciated.
thanks,
John
@ John – The easiest thing to do would be to run the foam up past the sill plate up to the bottom of the floor framing. Wires get buried in insulation everyday.
My plan on insulating my basement is as follows: install polystyrene foam againt the concrete wall. I will tape all the seams with tyvek tape. I will then istall drycore flooring panels on the floor. I will then put up 2×4 stud walls on top the drycore. I will insulate the stud cavities with fiberglass insulation. My question is: do I then put a vapor barrier between the fiberglass insulation and the drywall? I have been told not to do it as i would be creating a double vapor barrier situation.
@ Gerry – First off let me say that you should frame your walls before the drycore. The issue of the vapor barrier is a bit controversial. I say it depends on the thickness of foam you use. The best approach is to use 2″ of foam board and skip the fiberglass altogether.
Todd,
Do I need to add another layer of insulation to my basement walls? Or is it cost effective to do so?
Background:
I live in Denver, CO. I am in the process of finishing my basement. When the house was build (2002), the basement walls were covered with insulation that looks like it came in 8′ by 8′ or 8′ by 10′ blankets about 4 inches thick. I haven’t been able to determine the R-value of the insulation.
The interior side of the insulation is covered (faced) by a layer of white plastic that serves as a vapor barrier. The blankets are held in place with nails with big washers. I think they were shot in using Ramsets. The seams are taped with a heavy white plastic tape (not duct tape). It looks and feels like a big, heavy quilt has been attached to the walls.
I left the insulation in place and framed my walls by placing the framing (wood) up against the insulation.
As I asked above, Is there any significant value to adding rolled batts of insulation between the studs of the framing before I sheetrock the walls?
Thanks for the help, GREAT Website and information,
Troy
@ Troy – First off I’d recommend you cut a small hole in this insulation in a few spots and check for mold. If the insulation is dry and free of mold then you might be ok. I’d add another layer of insulation in your walls to add some extra R value.
Hi, I was reviewing the posts as I have a basement in Denver and saw a question from Troy on 4/1/09 that kind of answered my question but I still need more advice.
Like that posting of 4-1-09, we have an insulated basement that is vinyl-backed pink fiberglass, circa 2001. The entire basement has this taped-floor to ceiling material (looks like a padded room) and we’re not sure what to do with any vapor barriers as we finish our basement.
We’re considering two actions: 1. frame the basement and leave the vinyl insulation in place, undisturbed (only frame on the barrier-side of the insulation); or 2. remove the blankets, put the new wood stud walls much closer to the concrete foundation wall, and re-insulate to gain a needed 6″ of space that’s being consumed by the existing insulating blankets. In either case (1 or 2), do we need to put in a vapor barrier on the drywall side of the studs? I presume we don’t need a barrier on the concrete sides?
Troy made a good point that is worth repeating – Denver has extremely low humidity. Also, our foundation has a black resin sprayed on the home exterior that I presume is a moisture barrier.
Les – Regardless of the weather in Denver I’d frankly recommend you tear down the old insulation (it served it’s purposed insulating the room without finished walls) and do it correctly. I’d highly recommend you follow the details in this article: http://www.homeconstructionimprovement.com/how-to-insulate-basement-walls/
The exterior “damp proofing” will help keep additional water and moisture from getting into the concrete wall. However, the concrete wall itself is full of moisture which you need to keep from getting into your new walls and causing mold and mildew. The details presented in the article above are also recommended fairly similarly to what Building Science recommends. You should check out their site as well.
Good luck.
Todd,
Thanks for the quick reply. Due to a couple of mis-steps, I have seen then wall underneath in a handful of places. No mold. Dry climate in Colorado really helps with that.
I’ll follow your advice and add rolled insulation between the studs before I drywall.
I’ll let you know if I run into any other problems.
Troy
Can or should a moisture barrier (plastic) be used? I have some plactic and thought I would use it. Should it be put on before or after the foam insulation? I live in the upper midwest and my home is 40 years ond. Thanks, Terry
I would skip the plastic if I were you. Just be sure you tape your foam joints very well with a Tyvek tape or similar. Good luck!
Todd,
I live in Colorado (Longmont – about 30 miles north of Denver) and plan to finish my basement. Our foundation is poured concrete and I appear to have the exact same insulation as Troy:
The basement walls were covered with insulation that looks like it came in 8′ by 8′ or 8′ by 10′ blankets about 4 inches thick. I haven’t been able to determine the R-value of the insulation.
The interior side of the insulation is covered (faced) by a layer of white plastic that serves as a vapor barrier. The blankets are held in place with nails with big washers. I think they were shot in using Ramsets. The seams are taped with a heavy white plastic tape (not duct tape). It looks and feels like a big, heavy quilt has been attached to the walls.
Anyway, I have been reading from the various sites about using extruded foam as the first layer insulation and I am trying to figure out if it is worth doing this in the Denver area. Our basement has been dry and while we have a sub-pump hole we have no pump and no water in it. Talking to the local city permit/inspections people, they suggest framing by pushing right up against the the blanket insulation. I also had a local basement specific GC over yesterday and they said that they would also just frame over the blanket insulation. The GC said that they do not see mold in our area.
The question that I have is it worth pulling the blanket insulation to put up the extruded foam. I would probably use 1.5 inch extruded foam, and R13 fiberglass w/ craft paper between the studs. I could re-use the blanket insulation in the ceiling.
What are your thoughts?
@ Robert – It’s such a tough call. First off I would cut a few small holes in it and check for moisture and/or mold. If it’s dry with no signs of water or mold then I would agree with the others that you can most likely frame in front of it. History is a good judge so if it’s working fine now most likely it will continue unless you change something significantly. Best of luck!
What is your take on basement finishing systems like the owens corning basement finishing system that is a breathable system
@ Steve – I really don’t have any personal experience with the Owens Corning system other than customers coming to us after getting a quote for that system. It’s EXTREMELY expensive and I’m not really sure it’s the best approach unless you have a very good ventilation system. Then again this is just my gut feeling.
Todd,
1.)I’m confused about the vapor barrier.
I’m putting 1″ foam board up against my block wall and then framing a 2×4 wall in front of that. I’m going to put fiberglass insulation in the stud spaces but am not clear as to what I should do for a vapor barrier. In another post you said that if the basement is heated there is no need for a vapor barrier (mine will be heated). However in this post you say to use a vapor barrier. Which one should I do? If I should use a vapor barrier should I use poly sheeting or should I used kraft faced fiberglass batts?
2.) How should I make the 1″ foam board tie into the 1st floor joists? Do I have the foam board go all the way up between the floor joists and to the 1st floor subfloor? If so should I caulk the space between the foam board and the joists?
@ Ryan – I’ll try to answer both of your questions here.
1. You’re just as confused about vapor barrier as most people including myself some days. There is not clear position on this issue for many reasons but here’s my take. If you’re only installing 1″ of foam board then the theory is that 1″ is not really thick enough to act as a complete vapor barrier in itself. So, in your case you’ll probably want to install a vapor barrier on your framing over the fiberglass. Paper or plastic? Tough call, I’d use paper.
2. Make the foam fit around all the joists. You don’t have to cut them perfectly, buy some “Great Stuff” foam in a can and seal the edges with that.
3. Slab vapor barrier. This is a tough one, first it depends on what you might install for flooring. Depending on the product you can install a vapor barrier first. For instance, if you install tile you can install a layer of Ditra Schluter Mat first which will act as a vapor barrier.
Best of lucK!
Todd,
Thanks again for the great advice. What a great site! A few more questions (my wife accuses me of being a perfectionist). :o)
1.) When you say install a vapor barrier, does that mean I should put it between the studs and the drywall?
2.) I was going to go with paper because I heard that Kraft paper is slightly permeable and can breath when it needs to. Is that correct and/or a good choice?
3.) My slab is graded towards the floor drain in the middle of the basement. I was going to build a subfloor on top of sleepers to level it out. My thought was to use treated wood for the sleepers, glue them to the slab with construction adhesive, put down a 6 mil vapor barrier across the sleepers, and then put down my 3/4″ t&g plywood. If that would be good, how should I tie the subfloor (namely the vapor barrier part of it) into the stud wall? Is it even necessary to make it “airtight” since I will be only finishing off part of my basement?
I hope that’s not too many questions! :o)
@ Ryan – Ask as many questions as you like!
1. The vapor should be between the studs and drywall, you are correct.
2. I agree.
3. I honestly don’t have much experience with sleeper/sub-floors. I’m not sure that I’d put poly down on top of the treated framing. I’d be more inclined to seal the slab with some type of paint first. Then again I’m really not experienced with that approach. I’ve used some of the composite panels that have a plastic base and OSB sub-floor. It picks the wood up off the floor (I think they sell it at HD in 2×2 size pieces). You could put that on top of some sleepers near the drain.
I live in NE Georgia. I plan to finish my basement over the next year. I recently had a GC friend look at my basement and offer suggestions about wall construction and moisture. He took me to a home he is building to see his method. All he does is install a 2×4 wall leaving about 1″ air space between the masonry wall and the stud wall. Anyplace that wood touches the slab floor or the masonry walls is pressure treated lumber. Then he adds sheet rock wall board to the front (room side ) of the wall. He claims that the air space allows for enough air movement to prevent any mold or moisture problems. When I brought the HVAC technician to my basement, he said the heat pump system I’m installing in the basement would pull out any moisture, including the air in the 1″ air gap. I questioned whether a polystyrene layer on the back of the stud wall might be worthwhile. They both said it was unnecessary. What do you think? Could their method be workable because the temperature extremes are far less than in northern climates?
@ Mark – It’s very likely that the system you propose is a good one down there in Georgia. Especially when you consider that you’re NOT putting any insulation in the wall cavity that might hold onto moisture thus creating a problem. You may want to get one more opinion from another contractor just to be sure. Good luck!
I live in northern Massachusetts in a 50 year old farm house with a concrete block foundation. I dont have major water issues just high humidity and a few little water spots around the perimeter. I am planning a home theater and moisture is a huge concern.
1) Would all PT lumber framing be overkill?
2) Will the rigid foam board on the walls sealed up tight keep all moisture away from the framing?
3)Have you ever heard of concrete sealers rapidly destroying hollow concrete block from water sitting in the holes?
@ Jonathan –
1. Even if it’s all PT and you have moisture then it’s likely that you’ll have a mold problem. So, not overkill for long term reliability of the wood, but that doesn’t cure the water problem.
2. Probably not 100%, depends on how thick, how well sealed, etc.
3. I have not heard this, I suppose if the water sits there and starts doing a freeze thaw cycle then it’s certainly possible.
I will begin finishing my basement soon. I came across your website and was intrigued by your method for insulating basement walls. I had a question.
I was going to use your method (i.e. Dow foam board and studded walls with fiberglass insulation in the stud cavities). I have a few water pipes against a poured concrete wall that is above ground. What is the minimum thinkness of Dow foam board that you would recommend between the wall and the pipes in order to keep the pipes from freezing? (I plan on having a plumber bring the pipes out off the walls. He recommended installing 1/2″ foam board.)
@ Jeff – It really depends on where you live and and how exposed the concrete is to the outside. I would install 2 inches minimum if the concrete is exposed fully outside.
Thanks for your recommendation.
I live in western PA and that particular wall is fully above ground. The concrete is 8″ thick (I think) and is only covered on the outside with vinyl siding (again, I think).
@ Jeff – I would definitely go with 2″ then. It’s better to be safe than sorry.
Once the basement is insulated using your method, is there any need for the fiberglass insulation between the first floor and the basement and the fiberglass insulation currently located along the rim joist between the top of the foundation and the top of the sub-floow? I was thinking of getting rid of all this fiberglass insulation. (I hate the idea of having that junk just above the drop-down ceilings I am planning to install.)
Also, what do you think about Dow’s fiberglass-free bat insulation?
@ Jeff – DO NOT REMOVE the rim joist insulation. You absolutely need that. It’s a wash on the other insulation, if I were you I’d consider leaving it for sound proofing. I have not seen or heard about Dow’s new product.
Should I pull the fiberglass rim joist insulation, install the foam board insulation, and then place the rim joist insulation back over the foam board insulation?
Sorry about the rapid-fire questions, but I want to get a lot of the details down before I start.
@ Jeff – it’s probably easier to leave the fiberglass against the rim joist and run the foam up past that to the bottom of the sub-floor, then seal with foam.
Last question: What type of Dow styrofoam board to you usually use? I was on Dow’s website and they have a ton of different varieties (Tuff-R, SuperTuff-R, Tongue and Groove, Square Edge). Is there any differences between the different varieties when it comes to moisture resistance?
@ Jeff – You’re likely to only find Tongue and Groove in most stores. Tuff-R is really good but not necessary in my opinion.
Todd,
I’ve been following your system for insulating my basement and I had a couple more questions:
1.) Before I considered finishing off my basement I had sealed the walls with Drylock. The Drylocked walls are now behind 1″ of Dow foamboard. Is there any disadvantage/advantage to this?
2.) As I occasionally had water seeping in between my slab and my foundation walls I left a 1/2″ gap between the bottom of the foamboard and the slab. I then filled this gap with Great Stuff and slapped the composite lumber and treated lumber plates into place. Should I have sealed the bottom of the foamboard like that?
@ Ryan –
1. I don’t think it really matters. The Drylock can only help.
2. I would have left it open in case of water. However, I really don’t think it’s that big of a deal. If you get enough water it will come through and you’ll know about it.
Todd,
One more thing, thanks for the advice on the subloor/sleeper system. I’ve checked out those 2×2 subfloor panels but they’re pretty pricey and don’t allow you to shim your floor level. Do you know any sources that I might want to check out for advice on doing a subfloor/sleeper system properly?
@ Ryan – I would check out Fine Home Building or http://www.buildingscience.com/
I have a feeling that you’ll spend just as much doing a sleeper system. I’ll think about your situation and see if I come up with any ideas on using the 2×2’s while shimming as well.
Thanks for the help Todd!
I was reading another website (http://forum.doityourself.com/basements-attics-crawl-spaces/135236-basement-subfloor-qs.html) that recommended using foamboard insulation against the block wall but the authors said NOT to seal the joints with tape in order to allow the blocks to breath. You recommend taping them. What is the best way?
@ Ryan – I can’t disagree more. Check out the building science site and I think you’ll find that my method is very similar to theirs. You want to keep that moisture out of our living space. Water/moisture won’t hurt concrete, in fact, it makes it stronger….it’s a chemistry thing but trust me on that one. Good luck!
Todd,
Thanks for hanging in there for all these questions. You’re quite the sport. Thanks also for pointing me to BuildingScience.com — a tremendous resource for OCD guys like me!
Anyway, here’s my question:
As you explain the foam against the foundation, the point of the foam is 1) to prevent moisture from traveling from the foundation into the cavity of the house (instead traveling upwards and departing through the exterior, above-ground portion of the foundation) and 2) to prevent moisture traveling with air inside the house from making contact with the cold concrete or brick wall of the foundation, where it would collect and cause mold.
But other resources suggest using a “permeable” foam against the wall. And the very point of doing this, as I understand it, is to allow moisture to travel (albeit slowly) from the interior of the foundation wall into the cavity of the basement, where presumably it would dissipate into the air. As I understand this approach, the point is to ensure that no moisture collects along the interior of the foundation wall. (This approach recommends against any sort of moisture barrier between the studs and wall board, as that would defeat the whole idea.)
Aren’t these two approaches contradictory? In the one case the point is to prevent any moisture from traveling from the foundation into the basement, and in the other case the point is to allow the moisture to travel from the foundation into the basement.
I should probably note that our house is a brick-foundation bungalow built around the 1920s. We’re in central Illinois.
Please help.
Aaron
@ Aaron – As you’ve found out this is not an easy subject. I came up with my own approach to this based on all the things I’ve read and my knowledge of concrete/masonry. Concrete and masonry are all extremely damp and full of moisture throughout the life of the material. So for me, it makes no sense to worry about drying it out because you never will. The microscopic structure of these materials is much like a sponge. So, the question is, will that moisture build up to a point which leaks excess water down onto the floor and therefore into the room? I don’t think so and that is why I’m not at all worried about letting the moisture out from behind the foam.
I’m much more worried about any moisture coming from the foundation into the framing envelope and causing problems. If there was a perfect solution everyone would be doing the same thing. I hope this helps…or at least explains my position better.
Thanks, Todd.
What do you mean when you say you’re “not at all worried about letting the moisture out from behind the foam”?
I thought the idea behind your approach was to contain the moisture behind the foam, no?
When you say “letting out,” do you mean letting the moisture out through the exterior of the foundation wall or letting it out into the cavity of the basement?
Aaron
@ Aaron – I mean I don’t think you need to let that moisture escape. I’d rather lock it out from entering the framing cavity.
Also, would it be more effective for me to try and insulate and seal our basement — an old red brick foundation in relatively good shape — with the foam panels or with professionally-blown foam?
Aaron
Todd,
Thanks for the clarification on the “letting out” point.
Now I have a follow-up question on your point about how it’s unlikely that moisture on the brick will accumulate to the point that it leaks onto the floor. Even if moisture doesn’t accumulate to the point where it flows downward and disburses on the floor, isn’t there a risk associated with allowing it accumulate at all between the brick and the foam insulation?
Could that potentially lead to mold with even the slightest element of moisture caught in there?
If I understand correctly the point of the “permeable” panels (and perhaps I misunderstand), it’s to minimize the risk of even the slightest moisture accumulation. If the point of these permeable panels isn’t to avoid mold, then why go through the trouble of installing them?
Aaron
@ Aaron – In order for mold to grow it needs food. Mold will not consume foam and will therefore grow. I think it’s extremely unlikely that a permeable foam will allow sufficient drying to completely dry concrete or masonry therefore still leaving it damp behind it while allowing moisture to get to the framing.
You are correct, the BEST approach would be to spray foam it, but it’s expensive.
Todd,
Thanks again for your help.
Aaron
Hi Todd,
I am planning to go with alligator basement (http://alligatorbasement.com/)
They use EPS sandwitched bewteen magnesium boards for the walls. No stud walls.
Are you aware of any disadvantages with this technology?
Thanks,
Ryan
@ Ryan – I’ve never seen it before, interesting product.
Todd,
I have some plastic pvc drain pipe that is up against my poured concrete basement walls. Would you have a plumber bring the drain pipe away from the wall so the foam board can be placed directly on the wall? Or, would you cut the board around the pipe and seal around the pipe with foam spray?
Thanks,
Jeff
@ Jeff – I guess that depends on if the pipe is up against concrete that is below grade or not. If so, I’d most likely foam up to it as you suggest with spray foam.
Todd,
Could you please tell me a little more about the relative pros and cons of using fiberglass insulation between the wall studs after covering the foundation with foam?
In other words, what’s the relative benefit of using this additional layer of fiberglass insulation versus the risk of collecting moisture in the fiberglass once it’s covered with drywall?
And if the risk of collecting moisture in the fiberglass is high, would it make sense to use two layers of foam against the brick foundation — say, two inches of foam — rather than using any fiberglass?
Along the same line, I read somewhere that metal studs might pose a higher risk of moisture accumulation than wooden studs since the metal could transmit a chill from the wall, whereas the wood would not conduct a chill. Is this true? It seems to me that putting the layer of foam between the studs and foundation would mitigate any such risk of transmitting a chill from the wall.
Thanks,
Aaron
@ Aaron – You bring up good points. First off all the best solution is to use spray foam and completely seal everything up. However, that is VERY expensive. So I came up with this approach to create a cost effective solution. By installing enough foam you can seal off moisture. Then you install the fiberglass to achieve the R value that you need depending on where you live and the Energy Code that governs your area.
Two layers of foam is certainly better than any fiberglass. You are correct about metal studs. If they are not in contact with a cold surface then they should be ok.
All of this comes down to money and site specific parameters. If you’re house has significant moisture then I would avoid fiberglass. If you’re house is never really that wet in the basement then it makes for a cheaper alternative.
Todd, I’m looking at insulating and framing by basement just like you described here with the addition of using drilock flooring up against the foam insulation with the wall framed on top of the drilock in accordance with their floor installation guidance.
I live in Maryland (20650) and have a walk out basement where the exterior of the west wall is contained by the foundation, the north wall’s foundation slopes to walkout level, half the east wall is exposed with the foundation sloping back up, and the south wall is under the garage slab.
In the sake of saving money, can I install different thicknesses of rigid foam along the walls, say 1 inch where the foundation is on the outside of the wall and 2 inch where the exterior of the wall is exposed to air?
Also, do you think that my area would require additional insulation between the studs?
Finally, am I correct in understanding that the plastic vapor barrier will be directly behind the drywall?
@ Chad – First off I’m curious as why you would install the wall framing on top of the drilock? I’d be inclined to install the framing first and butt the drilock up against that.
As far as the insulation values you need it really depends on your states Energy Code. 1 Inch of extruded polystyrene only has an R value of 5 at best. So it’s not likely that 1 inch would meet a minimum threshold for Energy Code even as far south as Maryland.
If you end up using a vapor barrier it would indeed go behind the drywall, as close to the “warm” face as possible.
Drilock’s installation brochure shows building a framed wall on top of the flooring 1/4 inch in front of the extruded polystyrene for new installation and 1/4 inch in front of an existing wall. I thought it was odd too since even with a vapor barrier behind the drywall, the seam between the bottom of the frame and flooring would circumvent the vapor barrier unless some sort of additional sealant is installed.
Correction to my previous posts, I was actually referring to DRICore and mistakenly called it drilock. Too much research going on at one time.
Hi Todd
I live in eastern Ontario Canada, and I would like to insulate my below ground basement. My house is 34 years old, and the previous owner installed 1″ white styrofoam, glued directly to the poured concrete foundation. I have no wood framing on the exterior walls, but I do plan on building walls, to go against the styrofoam and concrete walls.
Here’s my question (finally) Do I need to add the blue styrofoam to the existing white styrofoam ? If so, do I then frame the wood studs up snug against both styrofoams ? If so again, do I need to install plastic/paper/etc vapor barrier before install the gyproc to the studs.
Sorry for all the questions, and thanks in advance for any info you can provide.
Best regards,
Ray
@ Ray – I would install at least 1-1/2″ of new foam in front of the old seeing you live up in Canada. The vapor barrier really depends on how damp your basement is. I would definitely frame up close to the foam.
Todd,
Which Great Stuff expanded foam product would you use around drain pipe? I was looking at the Window and Frame (blue can) product since it remains flexible and is low-pressure.
Thanks,
Jeff
@ Jeff – I personally would use the other expanding type. You want it to be rigid and it will also help fill things in better.
How much will the foam expand and how quickly?
Another question: Is it safe to use the foam around a dryer heating vent (with the hot air) and around a circuit breaker box? There are warnings on the can about the foam being flammable.
@ Jeff – How much foam is hard to say, it expands several times the size you start with, I suggest using a small amount, waiting for it to cure, then adding more if you need it later.
All foam is flammable to some state…but that’s based on a very high heat or direct flame so I would not hesitate to use it against panels or dryer vents.
Hi Todd-
Thanks for posting so much valuable information and replying to everyone’s questions. After reading the building science study 30 or so times, I beleive the best way for me to insulate the basement walls in my area (southern PA) is to do full height XPS foam followed by the framing. I do have a couple questions that I hope you or someone else may be able to answer.
1. Based the building science web site, my impression is using any paint on sealers for the walls should be avoided. Is that correct and if so, should it also be avoided for the the slab prior to putting a berber carpet down?
2. After installing the foam on the interior foundation walls, how close should the framed walls be to the foam? I’ve read some things that say there should be a couple inches away to create some airspace, but then others say it can go right up against the foam. Any help on this would be great.
3. You say in one response that it is ok to use a fiberglass insulation between the studs. Should that fiberglass insulation have a backing and if so are there any specific backing that I should look for?
4. Lastly is there any foam board that could be used between the studs that fits normal stud spacing? If so, that would seem to be a solid option.
Thanks again and I look forward to your thorough answers.
-Jeremy
@ Jeremy – See my answers below:
1. Honestly I’m not sure how I feel about the paint. My gut reaction is it won’t matter much but I tend to respect their information quite a bit.
2. I place my framing up tight against it. Leaving an air space isn’t a bad idea, however, it’s likely that the foam will “release” from the concrete and end up against the framing.
3. I used figerglass in my own house. The real question is the “vapor barrier”. I can honestly say I’m torn on this issue. I think it REALLY depends on the moisture levels in your basement. If you have a fairly dry basement I think the vapor barrier is ok. If you have a very damp basement then I’d skip it.
4. Most foam board is 24 inches wide. You may be able to special order 16 inch wide foam. However, I would caution you against this approach as it would leave the back of the studs un-protected.
I hope my answers help. If there were perfect answers then no-one would be writing about this subject. The most important part is to be honest with your basement situation and not push a finished basement if it’s not appropriate for your home. Some basements are FAR TOO damp/wet for a finished basement.
Good luck!
Todd-
Thanks for the quick response.
On answer #4, you wrote about being concerned about the back of the studs being unprotected. What do you mean exactly? I thought that most of the fiberglass insulation is stapled to the front of the studs. I just want o make sure I undertsand what you mean.
Also what do you guys like to do for the flooring? Do you do any sealants or do you lay carpet right down on the slab?
Thanks!
@ Jeremy – In #4 I thought you were suggesting that you wanted foam insulation the width of the stud bays. I thought you wanted to place the studs up against the wall then fill the stud cavity with foam. I was suggesting that might not be a good idea. Just be sure the foam completely covers the wall, then the framing, then any fiberglass between studs.
Floor really depends on your basement. Have you EVER had water in there? If the answer is no and there is NO history of water then I think you can just carpet normally. If there is a chance for water I’d take my time evaluating whether you really want carpet in there. If there’s a chance of any water I would suggest tile. You can still put down an area rug.
Thanks Todd. In #4 I was suggesting doing the foam against the foundation wall as normal, then framing and considering using foam in the stud bays vs. fiberglass. I was just thinking that may greatly eliminate the risk of mold/moisture isues even though the basement is really dry. Any thoughts on that way doing things, other than the obvious cost increase?
Another idea would be to do 2 layers of 1″ foam against the foundation wall and just do hollow stud bays. Would that be worth considering?
Lastly, unless something else pops in my head, do you guys use Mold Tough or some other brand of drywall that is paperless to reduce the risk of mold/moisture issues?
Hopefully that is it. I really appreciate your help.
@ Jeremy – Ideally you’d use all foam because it won’t promote mold or mildew. If you’re going to do that then I would suggest you just buy 2 inch thick foam board and install it in one layer. You can also install a 2nd layer either over the first layer or between studs.
The drywall issue really depends on moisture levels in your basement. If you use 2 inches of foam, tape the seams, seal around everything and you control humidity down there I think you can use regular drywall. If you have any moisture problems then I would suggest a mold resistant drywall.
Best of luck!
What about using the foil faced foam board against the block, and then framing up a wall? Good idea or not?? I’m in southern Minnesota…
@ Lyle – Foil faced insulation or polyisocyanurate also known as polyiso is a great choice in basements. It’s typically used in commercial construction and it’s typically more expensive. If you can afford it then it’s a great choice.
Todd,
I am about to go ahead and insulate my basement the way you’ve described. There is an area between the wall block and the poured cement floor where moisture has been all summer (it’s been very rainy the past 2 months).
It doesn’t seem like covering this area with the blue board alone will guarantee the moisture is contained. You mentioned Tyvek tape between the joints of the blueboard. Is there any product that could perhaps seal between the cement floor and the blueboard?
@ Rich – The best way to seal the bottom is by leaving a small gap and filling it with foam out of a can. You can use something like “Great Stuff” to fill and seal the gap.
Todd,
I live in Boston and am much more concerned about mold than cost. I appreciate your help in answering the following questions:
1. Do you need plastic vapor barrier between studs and drywall when using 2″ foil-faced Polyisocyanurate foam board against the concrete?
2. Would it be sufficient to use 2″ Polyisocyanurate foam without a fiberglass insulation between the studs?
2b. If you still need fiberglass, wouldn’t plastic-wrapped rolls of fiberglass create double vapor barriers, which seems to be agreed upon as a bad idea?
3. Would metal studs be better than wood studs in preventing mold and mildew on studs and drywalls or will metal transfer more cold into itself and the cavity and create higher odds for mold and mildew?
4. If you use metal studs, do you need any type of insulation between the slab and the footer?
Thanks very much,
Sam
@ Sam – Great questions, thanks for stopping by the site. As I’m sure you’ve figured out there is no perfect answer for insulating basements, however, you’re on the right track.
1. I would suggest you do not need a vapor barrier. In fact, if you properly seal the joints the foil will act as your vapor barrier.
2. Whether 2″ of Polyiso is sufficient depends on the specifics of your home and the current Energy code in MA. I haven’t lived in MA for several years so I’m not familiar with the current code situation down there. My gut feeling is 2 inches of Polyiso is probably darn close to being sufficient.
2b. If you’re going to use the Polyiso I’d try to skip the fiberglass and get the thickness of foam you need.
3. This is a question I get pretty often. You hit on the pro’s and con’s quite well. Again, no perfect answer. If you’re worried about mold, and you definitely use Polyiso only, then metal studs offer a better protection against mold. However, metal studs will transfer cold quicker to the drywall surface than wood studs.
4. I would use some “sill seal” (a commonly used foam pad used between foundations and wall framing) to create a nice tight seal. I’d also foam the back side of the track with some great stuff which will seal it even further.
Good luck!
Todd, This is very helpful. Much appreciated for your quick response.
What if you sealed the rigid foam to the back of the framing and then left a 1 inch air gap between the foam and the concrete or block wall for air movement to dry out any excess moisture?
@ MikeR – That would work. Might be hard to actually do though. Be sure you seal it all very well.
could also install 1 inch rigid insulation,pre fab walls & wrap back with tyvek then nail up walls allowing 1 inch air gap,fill with fiberglass insulation and install 6 mill platic on inside.This would prevent any any air or water getting into the insulation and let any water vapor to escape thru the tyvek.I am going to use delta dl on the floors but not sure whether to run delta under the outer walls to maintain a continuous air gap around living area and allow any water to move to the basement drains or to run it up to the bottom wall plate and keep water out.
I was leaning toward running dl under walls to let any water drain and to allow air movement & use of dehumidifier to help dry out.This would prevent insulation from getting wet and eliminate mold growth.
Todd,
Mike again. Queston:
When I glued the two 3/4″ panels to the concrete walls (toal of 1 1/2 ” thick) I did not remove the film faced plastic (for damge control) from the boards. Please tell me this will not make any difference. Reading your earlier article you didn’t mention that you removed yours either.
Thanks in advance.
@ Mike – I wouldn’t worry about it. I’ve actually never seen a protective plastic film on any of the foam I’ve bought before. Must be something new! Don’t sweat it.
Good luck.
Thanks for the quick reply, Todd. I won’t sweat it. Appreciate your time!
Todd,
I have a basement wall project where condensation was an issue and mold formed on and behind finished drywall that was attached to firring strips directly to the concrete block wall. The finished wall had no insulation nor moisture barrier. The old drywall and firring strips were removed, the Kilz or Dryblock paint was scraped off to bare concrete block, (yes about 400 sq ft. completely scraped off, been since spring off and on doing this). The paint was remove because it had bubbled in some spots and I worried about the adhesion on the rest of the walls. The walls were cleaned with a strong Clorox solution rinsed and dried for weeks using a dehumidifer.
I built a 2 x 4 stud wall with treated lumber for the bottom plate and left it 2 1/2″ away from the concrete block. I have spray foamed the 2 1/2″ cavity behind the stud wall and the rim joist area with closed cell Handi-foam insulation.
Finally, my question? Because of the cost I do not wish to fill the 3 1/2″ stud wall with the spray foam. What would be my best option for the stud wall space? Do I leave the stud wall empty? Do I use unfaced fiberglass insulation? Do I use faced fiberglass insulation? Do I need a moisture barrier behind the drywall since I have a tight sealed envelope against the concrete block walls? I have never been a fan of plastic film for moisture barriers?
@ Dan – I would say you should be done at this point with the 2-1/2 inches of spray foam. The closed cell foam should have sealed out any moisture problems. Sounds to me as though you are read to put up drywall or whatever wall finish you’ve chosen. Good luck.
Thanks for the quick response.
I just worried that the 3 1/2″ gap created by the studding might cause a temperature difference between the foam insulation and the drywall and allow condensation to form.
I like your idea of the the 1X composite decking board beneath the bottom plate. Wish I had that tip before I built my stud walls. I did use treated lumber for my bottom plate, though. I am going to use mold resistant drywall for the finished wall. Would you suggest using a 1/2″ strip of composite decking material cut with a table saw to place under the bottom of the drywall. Between the drywall and the concrete floor? I had planned on using a piece of treated lumber to fill the 1/2″ gap to keep the drywall off the concrete floor.
@ Dan – Should be no problem with the air space, there shouldn’t be a temperature differential in that space.
I would just leave a 1/2″ gap at the bottom of the drywall. Just cover the gap with base trim. I think the gap is better than leaving wood/composite there so that it’s not in contact with anything that might get wet.
Thank you so much for the information!
If insulation is omitted in the wall cavity could/should plastic be used as a vapor barrier,on the outer area of the stud wall before the drywall is put up? I plan to put up 2″ T&G foam taped with a stud wall.
@ Mike – If you install 2″ and tape and seal all the joints really well there is no need for plastic.
Hi,
I’m planning a basement redo and after reading a lot of info on sites like this I plan on using rigid foam (1.5 in) and then stud in front of that.
My question is that in my basement I have a step back in the wall. it goes up about 4’ish feet and then steps back 1.5 to 2 inches. How do I handle that step back and keep everything nicely sealed.
thanks for any advice.
-Mike
Mike C – Just cut the foam and step it as well. You can use a combination of spray foam from a can and tape to seal everything nicely.
makes sense, thanks for the insight Todd.
My basement will become a woodworking shop with some very heavy equipment (800 pound planer).
For the insulated subfloor I will exceed the rigid foam load rating if I place the rigid foam under the sleepers.
How would you recommend I install and insulate the subfloor?
Pete – With equipment that heavy I think you’d be better off not insulating the floor.
Thanks Todd.
I have tested this subfoor design. 2 x 4 sleepers under 3/4″ tounge & groove plywood. It’s strong enough to support the load. The sleepers are 16″ on center and laid on the 4″ side further reducing the span.
Question I have not is how best to insulate between the sleepers and what to use for a vapor barrier?
Pete
Pete – I would insulate the space with 1-1/2″ rigid foam. You could use a layer of poly for a vapor barrier if you choose. This would be similar to the details posted here: http://www.homeconstructionimprovement.com/how-to-insulate-a-concrete-floor/
Todd,
I am finishing a basement with a crawl space on either side, an interior block wall for support, and one exterior wall. Therefore only one wall is exposed to the elements with the other two walls being under the house with significant amount of roof protecting the ground that comes into contact with these walls. My question is should the walls that are next to the crawl space have the foam board insulation installed on them or not.
Thank you
Russ
Russ – I would for sure. Even though those walls are protected, they are still cold and damp.
Good luck.
Todd,
I am refinishing my basement and have a few issues I’m contending with. The walls are poured concrete, half below grade and the other half above grade. Previously there was wood paneling nailed to furring strips on the walls. I’ve pulled the paneling off and everything seems to be in pretty good shap from a moisture perspective. I want to install dry wall and have build framing using 2×4 studs etc. I’m thinking of foaming the sill area, because there is quite a bit of air that comes in through there, but I’d also like to insulate the walls and I’m not sure what the best approach is especially considering I have two very different exteriors (one pat below grade and the other above with vinyl siding over old stucco).
I’m thinking of either putting a layer of foam board or spray foam behind the stud wall and then filling in with bats, but I’m unclear about the vapor barrier part. If I seal the concrete walls up, could I end up trapping moisture in the walls (when using air conditioning)? Given that there was very little on the walls before and they stayed pretty dry (although the room was drafty and cold), I’m concerned I’ll over engineer this and create problems.
Also, either way, woudl you recommend removing the strips (they’re 16 inch on center for the most part) so there is a clean surface, or would you leave them up.
Thanks for your insight.
Kevin
Kevin – Concrete by nature contains water vapor for its entire life span. By installing a foam board or spray foam barrier you’re helping keep that moisture in the wall and forcing it to dry to the outside. Insulating with foam board is a great DIY approach, just be sure to seal all the joints well. I would remove the strapping and install the foam directly to the concrete.
Todd,
Thanks for the response. Two quick follow up questions:
1. So there’s no concern about keeping moisture IN with the foamboard say when the AC is on?
2. If I take the furring strips off, do I need to patch the concrete? I have the same issue with the carpet nailers I’m removing. Can I leave these unpatched, or how would you recommend patching\sealing the holes?
Thanks again for your help.
Kevin
Kevin –
1. Moisture inside a conditioned space is always a concern. However, you want to deal with that issue by mechanical means. It’s likely that moisture wouldn’t be solved if you did not install foam. I would just be sure you’re using some type of ventilation to exchange a proper amount of air.
2. I don’t think it’s necessary on the walls. For floors I would try to patch them before proceeding.
Todd,
My basement is finished (carpet, sheetrock walls, finished ceiling). However, the walls are not insulated. The walls were constructed with metal studs, and there is a huge gap between the sheetrocked walls and the concrete foundation: a 9-inch gap. I would like to insulate the walls. Do you have a recommendation?
Thanks.
Derek – Do you have any access back there? I would avoid filling the void with any blown in insulation as it will create a horrible problem. Not sure I have much advice, you really need some type of foam back there.
I live in a ranch house with a full basement; I have 1″ foam board on exterior concrete wall and 1″ bead board under the concrete floor. To better insulate the basement, I’m considering tacking 2″ foam board to the inside wall of the basement. The south wall has a few cracks in it and the SE has settled a bit because of water drainage issues. Would there be condensation problems between the 1″ on the outside vs 2″insulation on the inside. What is a better way to skin the cat.
I would appreciate your reply.
Regards,
Al
Al
You have 1″ bead board under the slab? did you mean blue board?
No issues with condensation doing inside and out in my opinion.
Good luck.
I’m going to be finishing my basement. I have a new house would I be ok with using 1.5″ foam & then stud & dry wall or would it be best to use 1″ foam & then use batt insulation between the studs with a vapor barrier? I live in Wisconsin.
Thanks
Mike – We’ve written several articles on the site which you may want to read and look over the comments. Those articles discuss this pretty in depth.
Short answer is.
1. One Inch is not enough under any situation as it’s not thick enough to act as a vapor barrier.
2. Living where you do, you’ll need either more foam or a combination of 1.5″ of foam and fiberglass.
Hi Todd.
We are planing to finish our basement in MA. I have read many of your articles and posts with interest. You suggest using 2-inch closed cell foambaord adhered to the foundation with construction adhesive, sealed with Tyvek tape at the seams and spray foam at the floor and joists, wall studs against the foam board, fiberglass between the studs (or an additional layer of foam board on the foundation) for added R-value, and drywall with plastic vapor barrier optional depending if fiberglass is used and how humid the basement gets.
Would you apply the same technique to a fieldstone foundation? The house was built in 1905. The house is built on sloping ground with one side of the basement completely above ground while the other about 2/3 below ground. No water issues. We’ll be heating the finished basement. Is one 2-inch layer of foamboard enough to prevent condensation when the foundation is above ground?
Thanks for all the great info.
LB
LB – I personally have no used this approach with a field stone foundation. While it may work the difficulty is trying to apply the foam to the foundation and have it stay in place. You could certainly test an area. Most stone foundations we see end up getting spray foamed which works very well.
2 inches works in some places, while more is sometimes needed in very cold climates. It really depends on the local energy code requirements.
For spray foam you would use at least 2-inches as well, right?
I think someone a while back asked about attaching the foam board to the back of the studs (I assume before lifting the wall frame into place) instead of the foundation, leaving a small gap between the foam board and foundation. Could this work? I suppose the trick would be getting everything sealed properly.
LB – It really depends on the type of foam. Most closed cell foams provide adequate vapor protection around 1.5 and 2 inches.
Yes one approach might be attaching the foam to the back of the wall, seems like more work than it’s worth to me. Just today I posted a new video discussing the foam board insulation method:
http://www.homeconstructionimprovement.com/diy-basement-insulation-video/
Thanks and good video.
I live in Virginia, code for the interior walls on a finsihed basement is R13. My basement is very drafty and stays fairly cold. I run a wood stove at full blast nonstop and it barely get tollerable. I have 8″ poured walls that currently have nothing on them. My friend just built a house and his basement is very similar. He just wood framed 2X4 walls about 1″ from the walls with treated directly to the floor and insulated between the studs with R13 backed with paper exposed to the interior and then drywalled. It passed inspection fine. I keep reading about this foam board and wonder if this is the way I should go or just do the same method as my friend.
I don’t want to overkill but I do want to do it the correct way and what is going to give me the best results.
One concern I have, if I add a 2″ foamboard and then frame in front of that, my exterior doors and window will have a very large inset from the inside, approx 9″
If I use a 2″ foamboard glued to the walls, then frame 2X4 walls right up against the foam, I will need to insulate between the studs to gain the correct R value correct? If fiberglass is used between the studs no plastic is needed between that and the drywall correct?
The top of the concrete walls are completely covered with wood, a 2X8 so the foamboard will go directly to the bottom of the joist. I understand why you need to insulate between the joist against the bandboard, but why is there a vaporbarrier used in this area?
Thank you
Mike
Mike – Thanks for visiting the site. You should also read a few other articles that I’ve written which will give you further insight.
http://www.homeconstructionimprovement.com/foam-board-insulation-values/
http://www.homeconstructionimprovement.com/how-to-insulate-basement-walls/
The detail your friend used will almost certainly result in a mold problem so please don’t make the same mistake.
There are several approaches you can use but the key here is creating an insulated vapor barrier against the concrete. So you’ll need a minimum 1-1/2″ thick XPS foam against the foundation wall, sealed, taped, etc. If you use 1-1/2″ XPS you’ll have about R7 so you won’t need much more to reach your energy code. You could use 2×3 framing to cut down on the depth of wall, finding fiberglass that thickness might be a problem. NO plastic is needed.
I like to use foil faced foam board between the joists against the rim joist so there’s a good vapor barrier.
Thank you Todd
I am going to go with your suggestions. a few small questions please. I am required to fire block on the inside of the wall along the bottom of the floor joist to seal that area off. I am assumming I do that and run the XPS board right tight up to it.
along one of my long walls there are witres along the entire length, about 10 of them tied together and secured, how can you vapor barrier an area like that ?
Along one side wall I have a joist very close to the outside bandboard so it only leaves a gap about 1/4 to 1/2 inch, should i just stuff with insulation since i can barely get a finger into the opening not alone my hand to work with.
I thought I would have an insulation company come out to talk to me and give me an estimate so to add to all of my confusion he said the XPS was a waste of money and not needed, he said frame my walls with 2X6 !!!! material and insulate with R19. I told him the walls on my house were only 2/4 and they were not boardered by a 8″ concrete wall so it was of no help
Thank you for yours, it’s great to have someone to go to for this kind of advice
Mike
Mike – Every code had different requirements on fire blocking so be sure to check with your local code official.
You want to cover all of the concrete that’s exposed if at all possible.
If you can’t more the wires than build a foam box around them.
Do you best on the tight bay, then insulate the next joist.
There are lots of insulation companies out there REALLY messing up basements! Stick to your guns!
Todd, I live in CT, and want to partially finish my basement. The foundation is pured concrete with large stones mixed in. The walls in the basement have some crumbling. Is this a problem? Do i need to patch all of the crumbling spots with hydraulic cement before I put the foam boards up?
Thanks
The real issue is whether or not water is getting in. Crumbling concrete isn’t necessarily a problem unless water is getting in. Of course now is the best time to address cracked and missing concrete.
thanks Todd, the basement never gets water, just the walls tend to sweat and smell damp. I just purchased the home a year ago and the crumbling was present, I have since put a dehumidfier in the basement, which helps. Just wanted to know if I had to fill the crumbled parts before putting up the foam. The crumbling is no more than an inch deep, and I believe the walls are 10″ thick.
It’s really not necessary. I would certainly fix any cracks or large voids.
Mike, I have a question about sub floor installation in a basement please. Its the old saw: “A man with one watch always knows what time it is. A man with two watches never does.” Well, in doing subfloor research, Ive found two approaches:
1. The first has one laying 1″XPS down (gluing it), then putting sub floor (4×8 Panels) right on top and attaching the plywood to the concrete with Tapcon screws.
2. The second uses sleepers and then puts foam in between the sleepers. BUT it seems that this would cause a thermal break AND provide a food source for mold.
Please advise.
For extra credit:
a. Since the tapcon screws penetrate the concrete, do we create a new way for water to get in? Do we squirt anything in the hole (cauck) before we screw the panel ?
b. Is one layer of subfloor sufficient ? Or do we need two ? Literature suggests a second layer at 90 degrees to the first.
Thanks
The answer to your question really depends on several factors including budget, existing conditions and finally available head height. There are literally dozens of approaches for installing a sub-floor and most solutions typically revolve around those issues.
The best detail for thermal issues is a continuous layer of insulation (i’d recommend at least 1-1/2″ for a proper vapor barrier).
The best detail for strength is the sleepers sitting in direct contact with the concrete.
The best detail for low overhead height is foam + plywood.
You see the answer will depend on your situation.
Even if you put some type of sealer in the hole I’m not sure it will change anything. One layer of 3/4″ should be more than sufficient.
Hi,
I am in a split-entry home with 4 ft concrete walls and am in the process of adding blue poly. The rep at the project desk suggest that I take a walk around the house to get an idea of where the ground meets the foundation. When I install the poly , on the inside, that i do not go above the ground level leaving a few inches of exposed concrete. This would allow any moisture that might build up, a place to escape. any thoughts?
Blue poly or blue XPS foam? The reality is that the outside of the foundation is typically open to the air where moisture can escape.
i have a walk out basement with upper portion of walls insulated with fiberglass insulation between studs and drywalled, while the bottom, 4ft. is poured concrete covered with fiberglass insulation with white plastic on the outside. i like to finish the bottom portion even with the top, but if i remove the fiberglass, i have only about 1/2 in, just the thickness of drywall. i can’t stick te drywall to the concrete, so how i deal with that.
Most people do one of two things.
1. Insulate the concrete with foam, then frame in front of it, creating a “shelf” that sticks out further than the wall above.
2. Do the same above and continue that framing up beyond the existing upper framing.
Either way I highly recommend you insulate that concrete with foam and NOT fiberglass.
Good luck.
Todd,
Thanks for the very helpful information. I live in NJ in a split level built in the 1950s with poured concrete block. I would like to install XPS but cannot use adhesive because my wife is allergic to it. As an alternative, can I construct a frame 2 inches or so away from the block, put the XPS on to the frame and then nail mold proof drywall into the XPS and framing? If sealed tightly, wouldn’t that prevent mold growth?
Thanks
Jon
Many times you can cut the XPS foam so it fits tight to the floor and ceiling framing so it stays in place. It really only needs to hold it up long enough to put the framing in front of it. Of course you’ll need to tape all the seams to get it air tight.
Thanks, Todd. Another question: After I demo the existing framing, I am going to have some french drains put in. My contractor is recommending a polydrain/eggcrate plastic which will run from the drain up the side of the block for approximately 8 inches. Would I place the XPS over the top of the polydrain, or start the XPS above it?
I would place it over the top. You want to keep all that drain plane behind the sealed foam.
Todd,
My home was built in 1922 and they used hollow red clay brick on the interior foundation walls. I have waterproofed the outside, plastering with mortar, then ironite and back filled with gravel. I now want to dress up the interior. It looks like someone has coated the interior brick walls with a “theroseal” type of product which is now flaking off.
Can you recommend any product which will adhere to this type of hollow red brick?
Thank you,
George
George – The trouble with coating a tile like that is the amount of moisture that gets behind the sealer. With any foundation there’s a ton of water vapor trapped in the tile and behind it. Your best bet is probably cleaning the loose material off and using some sort of epoxy coating system. I’d check with a local painting supplier that supplies products to contractors and ask them for a recommendation.
Good luck.
Todd,
I have finished my foam board insulation around my walls but have one issue. My electrical panel is in one corner, which I am building a closet for. Do i need to insulate behind the panel(it is mounted to particle board then attached to the wall). I was thinking of running the foam board right to the wood, and then spray foaming the gap. But I will not be able to get the foam board behind the wires which go ou the top of the box.
Mike
Mike – That’s what most folks do for a retrofit. When we build new homes we install the foam behind the mounting panel ahead of time. That will work fine.
I was wondering if it would be ok to paint the concrete wall. Then, put up the blue board. I figure it wouldnt hurt.
It won’t hurt…but it doesn’t do much to stop the moisture.
Hey, Todd,
I live in Loveland, CO, and like most counties on the Front Range, Larimer building codes require floating walls in finished basements here because of expansive soils (bentonite clay, here). How do you insulate floor to ceiling and still allow for the required 1 1/2″ heave gap? While we’re on it, should I just install the two layers of 1″ rigid foam between the code-required 16″OC studs? Glue the first layer to the wall, and the second layer to the first? When I look online, 1″ rigid foam with foil barriers is like R-3.5 or something; does two layers add to R-10?
Thanks!
— Rick
Rick – That’s a very interesting question. I guess my answer would depend on what happens at ceiling height and at floor level. What are the typical details to allow for the movement? Based on that I’d come up with an insulation detail that works in a similar fashion.
The amount of insulation depends on your local energy code and the fact that you need at least 1-1/2″ for a proper vapor barrier.
I am following this method to make a fishroom.
I have had mold problems in my basement before because there was a wall that leaked and mold grew behind the paneling without me findng it until it was very bad, I am worried about this again.
I have I plan on using the method of putting the Blue boardright up against the block walls, and sealing it with the great stuff foam and tyvek tape. The walls hav been drylock’d and there is no leaking just codensation on he inside, from my fish tanks.
My question is I was going to put the walls up first and then put faced fiberglass (R19)in the ceiling joist and then cover with blueboard. Would you recommend putting the fiberglass insulation and blueboard on the ceiling at all, and secondly would it be better to put the ceiling blueboard up first and then do the walls?? Thanks this is very intersting and looks pretty easy to do as long as I can seal it so no moisture gets behind the blueboard. thanks again.
Scott – First let me say you really should use a dehumidifier in that space if you’re not already. Are you talking about blue board insulation or plaster board on the ceiling?
I am running a de-humidifer and a fan on each end of the basement near the wall to prevent it from condensing on the wall. I was thinking of putting the foamboard on the ceiling to prevent moisture from going upstairs. I was planning on using the 2 inch thick Owens Corning Foamular F150 at homedepot, since I live in NW PA and it can get cold here.
Thanks
Just be aware that foam board should be covered with a fire resistive material like drywall. Your local building code should provide assistance with that.
Ok, I was unaware about having to cover it. I don’t want to put drywall in the room because of the moisture and water spills that will be present, or do you think the moisture resistant drywall would be ok and the best thing. I was also thinking about the white wall paneling used in bathrooms and putting that over top of the foamboard. If I did drywall what thickness of foamboard should I use, and if I did wall board what thickness foam should I use with that also.
The code doesn’t specifically require drywall. Each code is different but many talk about a thermal barrier in which case wood paneling sometimes works. Again, without knowing which code you use it’s hard to say. We’ve used 1/2″ OSB before, and quite a few other paneling options.
Also is the Great Stuff Pro foam sealant the best thing to use to adhere it to th concrete block? Is the Great stuff pro different from the regualar great stuff expanding foam?
It works great, not sure how different it is.
Todd,
All great information. My question to you is if I use XPS styrofoam, I read that it should be at leats R-15 to not have the surface (facing the room) be below the dew point. But I have also read that it should not be more than 2″ in order to allow some water to pass through it. I would like to use 4″ XPS against the wall and then have empty stud bays holding up the drywall.
Can you comment on the downside to using 4″ XPS styrofoam (other than the cost – which is significant).
I figure if I am going to insulate, I ought to do it once and be done with it.
Thanks,
Adam
Adam – I see NO reason to let the water move in that direction. 4 inches of foam is fine. Good luck.
Hi Todd,
Love the site, thanks for all the great information. I have a question that I haven’t been able to find much information on. I recently had french drains installed in my basement. The contractor installed a dimple membrane that runs about 12 inches up the wall and feeds down into the drain system. If I am going to insulate using XPS, is it safe to apply directly over this membrane? I can obviously seal/glue the top and sides of the XPS board to the wall, but I’m concerned about the gap that will be created between the wall and board where the membrane ends. Do you think this is a cause for concern?
Another option would be to use one of those DIY basement finishing systems where you attach a track to the floor and joists about 1 inch from the wall and install the board to the tracks. This would seem to avoid the issue, but is much more expensive. Any thoughts?
Thanks!
Craig
You can apply directly over the drain board. Good luck and thanks for the nice compliment.
Todd, your articles are well written. There is a lot of confusing and conflicting stuff out there. Thanks for bringing in some clarity.
I am finishing my basement in SC. All the concrete will be covered with foam. My question is about the walk out wall. Those walls are wooden studs on a slab, with no foundation wall. Currently they are insulated with faced fiberglass. I was thinking of tearing it out and putting foam between the studs. Since it is not touching concrete, is this necessary?
Not necessary but not a bad idea. Because there’s so much moisture in basements, I often find walkout walls with mold on them. The moisture tries to get out of the basement and gets trapped between the insulation an sheathing. I’d remove it and install foam. Good luck.
Todd,
Excellent site with very helpful info for a novice such as myself. In regards to windows in the basement, how close should the 2in foam board come to the bare frame of the window? I have poured concrete walls in a pit basement, and one wall has 4 very small windows. I am putting up the 2in board now, then will frame with 2×6’s in front of that, and finish it off with 1/2″ drywall. I would think that if I bring the foam board directly up to the frame of the windows (the frame is not very thick), then there won’t be any room left for the sill plates and drywall without covering part of the window itself. If I leave a gap between the window frame and the foam board, how much would you recommend and do I need to do anything to the remaining “rim” of exposed concrete around the window frame to minimize moisture there?
Kevin,
Get the foam close, but leave enough room so you can trim it and leave a proper reveal.
Todd,
Thanks for the great info this site offers. Geographically, I’m just west of Chicago, Il. Frame ranch with full poured concrete basement. From floor to top of 9″ thick walls is 85″. My insulation of choice is 2″ XPS installed as recommended.
My concept for the finished walls is to fasten expanded metal sheeting with concrete screws driven through fender washers to hold the expanded sheets firmly against the glued on, fully taped XPS. I The expanded metal sheets would then be skim coated with mortar as though preparing for a plaster finish coat. The mortar skim coat would then be finished with Drylock concrete paint. Ultimately, we plan to hang storage cabinetry positioned against the bottom of the floor joists above and against the skim coated wall and terminating 24″ above the floor. Floor to be finished in skid resistent epoxy.
Do you foresee any moisture, mold or structural concerns? It’s just a concept at this stage so I’m angling for things that are likely to cause problems either with installation or later on. Thanks for your consideration.
Dave – Gotta say that’s the most unusual approach I’ve heard so far but one that sounds promising. Sounds like a solid plan, just be sure you tape/seal all the joints in the XPS. Good luck!
I live in Pennsylvania and it’s cold in the winter. I want to insulate my 12” concrete block walls in my basement. My basement has always been dry. Covering the walls glued with 2” blue board, green board, or TSX 8500 R-max will create a vapor barrier and insulate, but now comes the finishing. Is there another way to finish this insulation such as: stucco or plaster; or would it feasible to place 2×2 treated wood or metal @ 16” or 24” O.C. on the concrete block wall first (acting as studs) placing the board between the studs and then place a fire resistive material (½” drywall) over everything? This would certainly save on space and the cost of another 2×4 wall. Pipes or electrical runs will not be covered.
George – The insulation should go first as you want it to be a sealed barrier. After that, there are several options:
– Frame a wall after the foam, the cover the wall.
– Install strapping over the insulation, then cover the wall.
I do not recommend framing first. Good luck.
Hi Todd-
Great website!
Basically we are in the process of finishing out basement- it consists of cinder block walls and it’s a 90 year old house- 3 of the block walls are about 1- 1-1/2 ft above grade- and the moisture intrusion seems more average- fairly clean walls with some efflorescence-
The main problem seems to be the wall that the foundation is completely underground and a hill runs into that side of my house-
Never had any flooding or water in my basement but that wall specifically has been painted with some black special paint and some white paint by previous owners I assume as a way to deal with moisture intrusion- you can see water marks on the wall and some very fine cracks and wear on the mortar joints- but again never any water on the floor or flooding-
For the 3 other walls since the foundation has atleast a foot exposed above ground I figured there would be a place for the moisture to breathe- we are using 2 inch Dow blue extruded polystyrene foam board- R10 value and vapor permeability .75 at 2 inches I believe- we are not planning on putting a vapor barrier- we are planning on cutting the foam in pieces to put against the rim joists as well- however I don’t think they are actually the rim joists in my house- I think it’s the pieces of wood that sit about 6 inches in front of the rim joist- in other words I can’t even see the sill plate- so would it be ok to just insulate that- Depending on how well the contractor seals everything I will determine if I need a vapor barrier or not- also I currently I am currently not planning on insulating the ceiling-
My question is the other wall that is fully below grade- should I treat it the same way? Or should I leave a six inch gap between the foundation and the blueboard so the moisture has a place to go and rise I between the joists above and into the ceiling and mingle with that air if necessary?
Anthony,
Your situation sound fairly normal. First and foremost I’d say make every attempt to correct grading outside to minimize how much water is directed towards that front wall. Not being able to seal the top of the concrete wall / rim joist area is certainly something to be cautious about. I’d try to seal it as best you can. As far as that back wall. I’d treat it the same way and be sure you’ve sealed things very well.
Good luck.
Todd
Thanks for the reply Todd. Just to make sure I’m understanding correctly the humid wall without any exterior foundation exposed you would still put the blueboard flat against the block- not a few inches in front leaving a gap-
Also, I definitely can’t insulate the top of the cinder block wall- there’s blocks of wood that sit pretty flush with the concrete wall so any moisture traveling up the wall will definitely go straight up to any wood behind this piece- which I’m assuming is the sill plate and the “real” rim joist- which is why I thought maybe it’s better to not channel all the moisture that way and leave the gap do the moisture can go everywhere and not just hit that wood directly? But I’m not sure-
And lastly- seems like yours not pro- vapor barriers if I’m using 2 inch- but would you insulate the ceilings?
Thank you!
Anthony – Whether you leave a gap or not doesn’t change the fact that the wall will give us a certain amount of moisture forever. So my opinion is you might as well put the foam up tight against the wall if for no other reason than it makes installation much easier. The top of the wall creates a logistical problem, ideally you’d get access behind there and foam it. That doesn’t seem realistic. Without seeing it myself it’s hard to say what I would do. I would possibly think about getting some ventilation holes in that joist so air can get back there and dry things out. At the very least I’d be sure the foam is sealed tight to the top edge of the concrete as best you can.
The 2 inches of foam creates the vapor barrier so long as it’s closed cell foam. Insulating the ceiling will certainly help your home feel warmer. Fiberglass can be an effective solution for the ceiling. If the basement is not “conditioned…i.e. heated or cooled” then the vapor barrier must go up against the floor, so paper faced insulation works well in that situation.
Good luck.
Thanks Todd and I apologize for the multiple messages- my contractor keeps asking me which way to go and I keep stalling until I feel better about my response which is why I want to make sure I understand this- yes I think it might cause a problem to have the sill plate and rim joist exposed to so much rising moisture from the block wall below- the problem is these “mysterious” pieces of wood in front of them are all around the whole perimeter not just between one of the joists- but all of them- I think someone told me once they are put there as fire protection so there isn’t a space there leading up to the higher floors- a few of the pieces have a metal plate on the front- in other words I can’t see the lower portion of the 1st floor wall cavity from my basement because this wood is in the way – and this is all around-
I guess I’m just scared that I’m going to be exposing my true rim joist and sill plates to a great deal of moisture by really sealing up the block wall and this piece of wood on front of the rim joist-
For the past 8 years I’ve had the basement unfinished, uninsulated and heated and haven’t had any problems so I figured maybe keeping things “loose” and flowing instead of tight and well sealed would mimick better what it’s been so far up to date? But this is a question as I’m unsure. but then again I’m not sure how sheetrocking the walls might change that equation up a bit – before everything was all exposed and flowing- (which I’m hoping will help explain to you why I keep going back to that “open” and loosely insulated thought.)
Anthony – This stuff is always complicated and your situation is even more so because I can’t see it. Some builders actually use a double rim joist because they believe it helps support the wall framing above better. Some situations it could be fire blocking (but I doubt it). With what you’ve told me, combined with your basement being “dry”, if it were my home I’d install the foam direct to the block wall. I’d then frame the wall in front of the foam and leave the stud bays open (no fiberglass), then drywall. I’d seal the top of the foam to the top of the wall as best you can to trap any moisture from leaking out the top joint. Is this the best approach? We’ll never know, but I do know that this solution is far better than just framing a wall and using fiberglass.
Thank you Todd- and I assume you would still insulate the front “rim joist” with the 2 inch foam board-
I almost forgot to ask you would you leave a crawl space open to vent- or can I insulate it with 2 inch blueboard- seal the soil on the ground and the block walls and then close up the access panel-
I’m not sure I’d insulate that rim joist. Considering your situation I’d probably not. Yes on the crawl space.
Yes I decided to not seal the rim joist- seems like it could do more harm than good- in this case-
Just to clarify- For the crawl space- you are saying yes to leave it open, correct? Of so- from the inside or outside-
I would leave it open to the inside.
Thank you Todd! (And sorry for the billion questions)
I have an irregular stone foundation in a 100 yr old home so using rigid foam is not an option – what would you suggest ?
Spray foam is the most appropriate choice.
I’ve heard from many that “tyrek” tape comes off. That formulur joint tape is best..but you have to order it and its like $35 for 90 feet!
Do I need to put up plastic before drywall on walls in basement? NOT talking about the ext walls. But the inside walls? Not all of basement will be finished, just a big 12×14 square.
On the other walls you’ll still need a proper vapor barrier. Good luck.
Hi Todd,
Thanks for the informative info and videos. Great job!
My question involves how to insulate and frame a vertical wall that has support beams 3w x 5d extending to the floor joists from the floor to support bowed concrete walls? Fyi- no water issues:)
Thx, Roman WI
Roman – I’d most likely encase them in insulation. Before doing that I’d also try to seal them to help protect against premature rotting. Good luck.
Thanks Todd, for the quick reply.
Im sorry, i forgot got to mention the beams are steel. So, encase them with 2″ foam board or can i go with a smaller size board? Also, when framing should i place the wall against the foam/beam? Thanks again for your time and patience!
Roman
Roman – Hard to tell what I’d do without seeing it. You could install foam up to the steel, then around it to box it out. Then either build the wall against the foam (boxing in the columns so they look like columns, or build the wall out in front of all that to hide it all.
Thanks Todd for all your advice, I appreciate it a lot.
Roman
Hi Todd,
I like the website and have a couple questions. I redid my walls in the basement because of a moisture problem. these are 2×6 walls with outside exposed and one patio door. I have the same problem again and found your website watched the movie. I am going over everything again and making sure all air leaks are covered with foam. I have 2×6 walls with 2 half walls and the rest full on 0ne side of the house R-19 insulation. I do not plan on making any rooms for now. Question, do I need 2 inch or can I use the 1 1/2 Polystyrene extruded and the tape to cover seams. Do I use the foam to hold to the studs or screws also or both.
Thanks Bruce
1-1/2″ is the minimum you need, so that’s fine. If you frame a wall in front of the foam that will hold it in place. Otherwise you’ll need some foam. Check your local code and be sure you don’t need to protect the foam for fire code.
Good luck.
Hello Todd. Great article, thanks much for taking the time to post it. I had a couple questions if you don’t mind. I live in Thornton,CO; not far from Denver. I’m finishing my basement and was wondering about the insulation. Like others, I have the white vinyl faced insulation along my exterior walls, but they have some small and large holes in it. I tracked down the same vinyl facing to tape over the holes as some were pretty large. Will that cause any problems if I cover everything with another layer of the vapor barrier? Also, what do you suggest in regards to insulating my basement ceiling? It is heated, would I need a vapor barrier there as well?
Thanks again, hope to hear from you soon.
Jason – Is it vinyl covered fiberglass? If so I’d tear it all out. Fiberglass has no place in a basement in my professional opinion. I know that will likely cost money, but it’s not worth the risk.
I HAVE 1″ STYROFOAM ON MY CONCRETE WALL. BECAUSE THERE IS A DRAIN AROUND THE PERIMETER OF THE BASEMENT, I HAD TO FRAME INSIDE THE DRAIN. WITH A 9″ SPACE BETWEEN THE WALL AND FRAMING, SHOULD I PULL PLASTIC ON THE STUDS AS WELL?
No….but 1″ of foam isn’t enough either. You really should add another inch.
Hi! We’re working on our basement, tearing out some dated and uninsulated wall materials and replacing it with 2×4 studs/drywall + insulation. My question is this: our house is from 1959, and the poured cement exterior walls are not smooth/flat, but have little bumps now and again from the materials used to hold the concrete when poured. These extend at times up to 3/8″ from the wall. Would this uneven surface be able to hold rigid foam board securely? I would think, at least after framing in front of it, it would be okay. The gap between the foam board and the wall wouldn’t be an issue? And is the jury out on painting Drylock onto the walls before adding the foam? We have a lot of fluorescence on the wall, and some of the old drywall had mold on it. Any advice you could give would be appreciated!
The Drylock can’t hurt :) Typically we’ll knock off the concrete bumps to help make the surface flatter to install the foam on.
Todd:
I painted my basement block walls with UGL DRYLOK Extreme (2 coats) and I have installed 1 ½ inches of Owens Foamular tongue/groove insulating sheathing with PL300 adhesive to the block wall. This sheathing has all seems caulked and taped and the bottom of the sheathing at the floor is foamed to completely seal the wall from the inside atmosphere. This same process was done on the top of the block wall by the rim joist. I am using your suggestion of placing a piece of TREX decking under the entire length of my stud wall beneath the pressure treated bottom plate. The stud wall will have 3 ½ inches of ROXUL mineral wool bats as this stuff is resistant to mold, vermin, fire, and if it gets wet it does not lose its insulating properties after it dries. Do you still have to use a vapor barrier on the stud wall toward the basement interior prior to dry walling or can this be skipped due to the 1 ½ inches of foam board that acts as a vapor barrier?
Also, did you use the TREX decking under your stud wall that has a smooth bottom with a thin cork like layer or the TREX decking with the shallow scalloped out trough the length of the decking or doesn’t is matter? I was thinking of the decking with the smooth bottom as there is less area for spiders, etc.
Let me know your thoughts on both questions.
Sounds like you have a great plan. No vapor barrier, and the type of trex/composite decking doesn’t matter. GOod luck.
please add me to your newsletter list
thanks
Peter – You have to sign up here: https://www.homeconstructionimprovement.com/subscribe/ it’s a double opt-in process to help prevent spam. Thanks