

Bay Window Floor Insulation Detail

Bay Window and Floor Deck Cantilever Insulation Details
I’ve written quite a few articles on how to insulate basement walls and floors but one more specific topic related to this subject keeps coming up and that’s how to insulate a bay window floor or cantilever floor framing. In this article I’ll share a detail for new construction and also a detail for renovating existing bay window floors and deck overhangs.
With the deck overhanging the foundation wall the area is exposed to extreme temperatures and the possibility of significant air infiltration. Even with 2×12 floor joists you’d be lucky to get a R30 insulation value with the floor perfectly sealed from air using fiberglass. That’s a big “IF” and frankly even at R30 that’s really not sufficient in cold areas of the country. With even a minimal amount of air infiltration that R value plummets to R15 or less!
The following details address both air infiltration and increased R values to promote a much warmer floor system around deck overhangs.
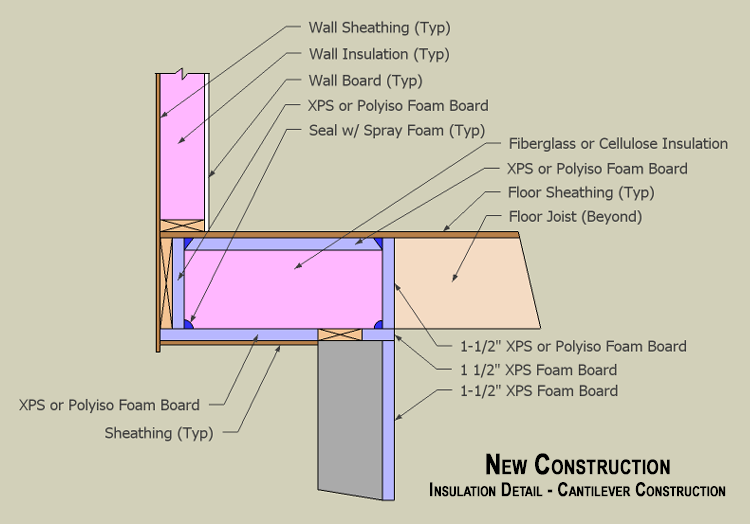
New Construction – Bay Window / Floor Overhang Insulation Detail
The sketch above shows one method for insulating the deck overhang at a bay window or cantilever that encloses a bump-out. Quite often the insulation in this area is dealt with long after the framing is finished and results in a very cold drafty spot in the house. Most often I see this area stuffed with fiberglass insulation after the house is built and thats just not an effective approach.
It’s important to note that this detail needs to be addressed during the framing process. The following steps will help reduce air infiltration and increase the effective R value.
- Install a layer of XPS or Polyiso foam board insulation to the bottom of the cantilevered floor joists. At a very minimum I’d recommend at least 1-1/2″ to 2″ of XPS (polyiso will achieve higher R values).
- Install exterior grade sheathing product below previously installed foam board to protect it from the elements and rodents.
- Inside the basement area, install a piece of 1-1/2″ XPS foam on top of the foundation wall tight to the sill plate (seal against the sill plate with spray foam from a can).
- From the top side, prior to sheathing the floor deck, install XPS or Polyiso foam board tight between the joists and tight against the rim joist. Seal all the edges with spray foam. Also be sure to seal the bottom of this piece of foam to the lower piece previously installed below the joists.
- Install an additional piece of XPS or Polyiso between the floor joists directly above the foundation wall (as if it were joist blocking). Again, seal this piece around the sides and bottom.
- Install fiberglass or cellulose insulation in the joist bay.
- Install a final piece of XPS or Polyiso on top of the fiberglass or cellulose. Be sure to seal this piece to all the framing and foam.
- After all those steps you can install the deck sheathing.
The real key to this detail is spending time sealing every very well. Air infiltration is the root of all evil when it comes to how cold / hot a floor feels with this sort of location.
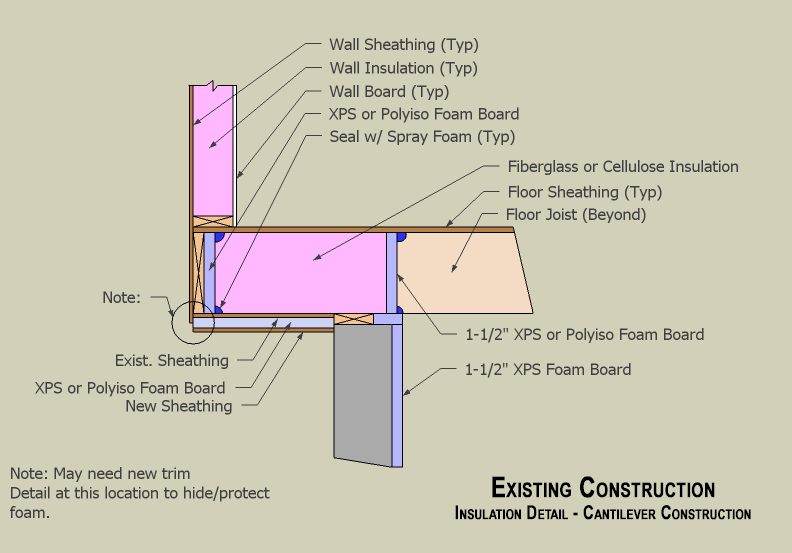
Existing Construction – Floor Overhang Insulation Retrofit
The detail above shows one approach to retrofitting an existing floor cantilever that you might find at a bay window or fireplace bump out. In this situation, its likely that only some fiberglass was stuffed into the joist bay after the framing was complete. There are several ways to deal with this such as spray foam or blowing in cellulose. However, if you’re looking for an approach to do yourself without specialized equipment the one shown above will work pretty well.
The key to the success of this approach is having adequate access to the interior joist bays from the basement and also to the underside of the cantilever from the outside. Both locations may prove very difficult to access to this is something you need to evaluate before you begin. The following steps describe the approach shown above.
- The first step will be attaching some XPS or Polyiso foam board to the bottom side of the cantilever from outside. If you can easily remove the existing sheathing then I’d recommend that. If not, install the foam over the existing sheathing as shown above. Be sure to keep it as tight to the foundation and perimeter of the cantilever.
- Install some protective exterior grade sheathing to cover up the foam. This may require some creative trim details to hide from the front such as a decorative water table or similar detail.
- From the inside, try to install a piece of XPS or Polyiso tight against the rim joist. Be sure to seal the edges with spray foam.
- Pack the joist bay full of fiberglass or cellulose (cellulose may be difficult).
- Install a piece of XPS or Polyiso between the joists and above the foundation wall. Be sure to seal to the joists, foundation, and deck above.
This approach will significantly cut down on air infiltration and improve the overall effective R value.
Final Thoughts – Insulating Floor Deck Cantilevers (Overhangs)
They keys to remember when insulating a deck cantilever (like bay window floors, 2nd floor overhangs, and chimney chases) if providing sufficient R value and preventing air infiltration. The minimum recommended R value for Zone 6 (DOE) is R30. If you’re using fiberglass, that number is nearly impossible to attain with just fiberglass and no air sealing even in a floor with 2×12’s. So the key is getting increased R value while also stopping as much air infiltration as possible. Following these key steps will help you make your floor overhang much more comfortable in the winter and summer.


Todd,
Great article and one that I found very helpful, as I am about to attempt to insulate my cantilever floors. At this point, they are totally without insulation. The cold floors and draftiness is definitely noticeable, even in Zone-3 (Central GA). I plan to use XPS rigid foam board for the top of the box (under subfloor), rim-joist, and the bottom of box (exterior sheathing level). I will also seal the foam board edges in place with Great Stuff spray foam. Because I’m in a mild zone, my question(s) is: Do I need cellulose or fiberglass insulation in the bay or is my above steps enough? Do I need to install the xps foam board between the joists, above the basement foundation wall – I believe this may be called “blocking it off”? Note: the basement maintains a nice temperature and doesn’t get very cold, even in winter, and even though the walls are not insulated. Also the basement ceiling (floor of the living space) is not insulated.
Good luck this hunting season!
Jeff
Jeff – Glad you found the article helpful. The foam alone will certainly make a big difference, not only in the winter, but in the warmer months. It really comes down to while you have it torn apart, I’d install $20 worth of fiberglass as well. The benefits certainly outweigh the costs. In your situation, you can likely keep that area open to the basement. Good luck!
Todd,
For my area and application, what thickness would you recommend for the foam board?
thanks!
Jeff
Being such a small area most likely (I’m assuming a rather normal bay window), I’d use 2″ foam board, preferably polyiso or XPS foam.
My cantilever areas actually run the entire length of both sides of my house, with each bay being about 3 ft in length by 14 / 15 inches wide. So, quite a bit of un-insulated space. I’m torn on whether to attempt to tackle this myself or hire someone to spray foam into each bay. One side of the house will be challenging to access the bays from the outside as they are only about 2 ft off the ground.
Gotcha…..if those areas are accessible from inside the spray foam would certainly be a great option.
I have a bay window with a cantilever floor in northeast PA. In the winter the floor above the cantilever is very cold as compared to the floor above the basement. The cantilever is covered with perforated soffit and filled with batt insulation. Recently I removed the soffit and installed 1.5 double sided foil -face rigid foam board (rmax). One vertical piece on the rim joist, one vertical piece above the sill plate on the foundation wall, one horizontal piece on the subfloor. I plan on filling the cavity with roxul followed up by one additional horizontal piece of double sided foil-faced rigid foam board nested between each bay. Then finally I plan on reinstalling the soffit.
My concern is will I create a moisture problem because I used foil-faced foam board and should I have used unfaced rigid foam board. I sealed the perimeter rim joist with silicone before applying the vertical piece to the rim joist. Should I remove the foil-face rigid board and start over with unfaced rigid foam board? The area of space is 2 x 10 at most.
Hi, I live in an 85-year-old uninsulated house in Topeka, KS (Zone 4. I might not have time yet this year, but I’m investigating how to insulate an 8′ wide (floor joists extend about 1.5′ out from the main foundation) bumpout of our dining room area.
On the Terry Love forum, I’ve seen a solution of closed-cell spray foam on the sub-floor layer (to provide air sealing and adequate vapor barrier) and fill in the bays with fiber (I assume fiberglass?) insulation, and then close the bays off from the basement with Thermax (I think this would suffice for being a fire retardant). Any thoughts on this?
Also, for your solution above, would the XPS need to be on the outside of the bottom sheathing? I would rather not have to deal with that. What about on the bottom of the bumpout interior? Also, I’m concerned about a vapor barrier (I’m new to this stuff, so I don’t know how much of a concern it really is). Would the XPS on the exterior provide that?
Dave – When you use a minimum of 1-1/2″ (preferably 2″), it acts just like closed cell spray foam. This eliminates having to get a spray foam company come in for such a small area. So, best solution would be 2″ xps installed on the bottom of sub-floor, sealed with can foam, then fiberglass or roxul, then another layer of foam, then plywood to seal it up. The bottom of the floor is the warm side, so it’s the side that needs vapor barrier…which closed cell foam is.
Good luck.
Hi Todd, thanks so much for your kind reply.
Do I need faced or unfaced XPS? I’m guessing unfaced. And plywood to seal the bays, into the basement? Would XPS on the inside of the wood be necessary? I had thinking of closing of the bays just with pieces of XPS alone.
Another thing is that right below the bumpout is a basement window – old, single pane. Is there anything to be concerned about there?
I never use faced XPS, regular DOW or OC is fine. Sealing the bays with foam is fine, but you need to figure out if the foam should be protected against fire in the basement. Codes vary on that. Only thing on the window….too bad it’s single pane!
Hello, I found your article very helpful and straightforward. I have a first floor half bath with a closet that we use as a laundry space. The closet portion is cantilevered into the garage. Would it make sense to insulate the wall and ceiling cavities the same as the floor with the rigid foam/ figerglass combination? I can easily access these areas from inside the garage. Also, would there be any benifit in leaving an airspace under the floor on the basement side to get warm air from the basement? I live in MA.
Dave – Definitely will help to insulate that wall and a portion of the floor. If you insulate the portion of floor that hangs into the garage it will help so much. You can likely also so the entire floor depending on how that closet is heated.
Thanks Todd,
The rest of the floor in the basement is already insulated with fiberglass batts. The bathroom gets heat from a section of hot water baseboard. I will definitely air seal and insulate the wall, ceiling, and cantilevered sections that are framed into the garage. Should I add blocking in the floor spaces or leave basement ends open to allow the somewhat warmer basement air to flow into that space?
Thank you again for your time.
Dave
Dave – I’d insulate the entire floor actually. If you’ve got baseboard heat in there then insulating the floor is more important. Good luck.
Hi there, Todd.
Thanks for the great insights!
Mine is a retro and I’m not in the best of health (otherwise I’d do it myself).
Is there a “most economical” recommendation for technique (regarding TIME and MATERIALS) since I’ll have to be paying someone to do it?
Also, I searched for XPS and Polyiso Foamboard (and also polyisocyanurate, as Depot.com calls it) on Depot’s website here in Canada and came up empty on both counts; what gives? Is it possible the product isn’t sold here for environmental or code restrictions?
Thanks!
In Canada it’s prob just a different name. You’ll want a closed cell foam board product. Best advice….talk to 2-3 different contractors, get written estimates. Good luck.
Hi Todd
I read you replies to others, very helpful. My area of concern is the bay window and under the bay window. It is cantilevered about 24″. I will either hire commercial spray foam on the inside from the basement or I will do the 2″ XPS foam board. If I do the foam board, I will seal it with Great Stuff. I know this will help with the cold, but my real concern has to do with rodents – mice specifically, which is why I am pulling out the fiberglass bats from the basement side. If I do the foam board inside and underneath the bay window, is that something that mice won’t chew through? Same question for commercial spray foam. And finally, there is about 4″ to 6″ of space from the bottom of the bay window down to the dirt. Am I better off:
1.) leaving it open to the outside (after foaming)’
2.) trying to seal the opening along the bottom of the bay window edge (with bricks for instance),
3.) Or, have the whole area under the bay window filled with spray foam.
The house is and existing home – 30 years old.
Thanks
Kirk – I think mice will be far less likely to “chew” the foam than mess with the fiberglass. You’ll want to fill that area solid with foam, and then cover it with some type of cladding to protect it. Good luck.
Very nice write up. I’m doing a kitchen remodel and removed a soffit the ran along the back wall of the house. Once down, I was able to access the 2′ second floor overhang. While I don’t think that temperature was much of an issue (it only had r13 bat so it was under-insulated), but I found that it was very damp in the joist spaces. I picked up some r35 bat to stuff in the spaces, but I’m not sure I’m dealing with the moisture problem adequately. I was thinking some soffit vents might help, but everything I see here indicates that the space should be airtight.
I don’t believe the moisture is due to a leak, but rather condensation, hence the thick batting.
Assuming the issue is condensation, will the above mentioned technique address that? Mostly everything mentioned is addressing the cold outside air.
Ps. I live in Ohio, so we do deal with some very cold temps
Thanks!
Steve – Without seeing the situation it’s always tough to say what’s going on. Sometimes, overhangs can trap moisture as it rises along the outside of the house. At the very least it was VERY underinsulated. My preference though is using some sort of foam product, sealing it to the floor above, and then possibly a vent to help dry things out.
Todd,
I am currently renovating the basement are of my raised ranch. I removed my old drywall from the ceiling to find compressed fiberglass in the cantilevered area. I guess that’s why is cold, can believe the heat pipes never froze. I installed wood blocking in these area, probably overkill. My though was to use 2″ XPS in the outside and fill with Roxul (like your post), then another 2″ XPS on the inside rim. That would give me 4″ of foam insulation 2″ out, 2 In. Is the best way to do this or is it overkill? If I switch it to ISO on both sides of my blocking will the foil would create moisture issues? Or is XPS the better choice?
Thanks
Mike
That approach will work very well. Good luck.
Thanks for the info, more importantly, the diagrams. I have a bump out that connects to a fairly low deck, so outside access is somewhat problematic. It suffers from cold floors so I will be insulating. I will also be insulating all rim joists too. But, I have some concerns:
– XPS or Polyiso? Faced or unfaced? And where to use each, if necessary?
– Why is there no rigid foam attached to the bottom of the subfloor for the existing construction like the new construction?
– If I decided to put rigid foam on bottom side of subfloor and bottom of cavity from inside instead of outside is that a good alternative to installing rigid foam? If 2″ Polyiso is used, that’s R13, totaling R26 just from rigid foam. Correct?
– If, however, I install as in the diagram, rigid foam from outside, how do you attach the foam board? Also, how do you attach the plywood sheathing? Do I screw it into the foam board, seems unlikely? Am I missing something?
Do you recommend installing XPS cavity floor if it’s difficult to install from the outside? Also, if I’m able to install from the outside, do you recommend a particular fastener for putting screws through foam board? Or regular deck screws are fine?
Thanks.
I’d use a screw with a fender washer. Use something galvanized or coated. The difficulty depends on the ground clearance.
Do you need to worry about any condensation issues when you are insulating the overhang with the “NEW CONSTRUCTION” method?
Hi. I am just finishing up a new bay window project in SE Minnesota. I removed an older very drafty shorter bay window with a new modern high E glass window. I have also taken the area down to the floor level to add just a little more living space. I strongly believe in the foam board for insulation. Originally, the old 2 x 4 construction was not adequate. Where I could I have used 2 x 6 boards instead. I have incorporated layers of 2 inch in all the spaces between the joists with the great stuff foam. Presently only the spaces between the wood boards show potential areas “weakness”. I use a FLIR one IR camera for imaging. Sealing and foil I hope will keep my new construction draft free and air tight. I have seen very information about layers of foamboard. Except only to stager seams when possible. Any concerns or comments?
I have a cold floor cantilever bay window and dont have access to rim joist or floor joists as the basement below is finished with drywall ceiling. Removing shoe molding; I was thinking drilling small holes through the floor in the corner where the baseboard meet the floor every 3 inches along bay window and injecting high expansion great stuff to completely fill the bay window joist space. I wont have a lot of control of direction but figured I would keep filling until it pops out holes. Will this work?
HIGHLY doubtful…if you want to fix it you really need to remove some drywall, it will be worth it in the long run.
Zak,
The Great Stuff requires moisture to cure. If you do what you propose, you may end up with runny unsecured gunk behind the drywall.
Todd,
This article was very helpful. My wife and I recently bought a rental property with a cantilevered bay window. The house was built in 1943 and had no insulation under the bay. I could lie under the bay and see the subfloor in the diagonal portions of the bay.
I was able to put at least 4 inches of XPS and sometimes 6 inches under each section of the bay. I also added exterior plywood under the diagonal portions.
I’m sure it will be much warmer. Thank you for providing the information.
My 7’ x4’ bump out is over damp ground in British Columbia Should I be damp proofing the plywood sheathing that goes on the underside say with a rubber-like paint on product ?
Todd, thank you for the information. I had a terrible mouse infestation in the fiberglass in the basement cieling, so I pulled it all including along the rim joists. I will DIY the rim with polyiso and spray foam to seal, as you suggest.
Question: I have wiring, gas lines and a drain pipe from my water softener attached to the rim joist with u-nails etc. This will prevent smooth contact of the foam board to the wood, and if I cover it, I am concerned that any work on wiring etc. would be difficult. Also it will have some air space between the rim and the foam.
What are your suggestions for this case, which I expect is typical? Thanks!
Russ
In those spaces you are likely better off with Rockwool insulation. Anything to get into all the gaps. Just don’t use fiberglass.
Hi. Excellent info. This and your info on basement insulation is exactly what I need. How much of a compromise would just gluing xps to the sheathing (osb) of each joist bay of a bay window? Rather than removing the sheathing from the exterior and attaching 2″ of xps and then reinstalling the sheathing, what if I glue down xps to the sheathing from the inside between each joist? I know I don’t get the thermal break, but I don’t have to deal with 2″ on the exterior siding. Use your approach for existing construction but add xps to the bottom of each cavity between the joints. Then along the rim joist, fill with a batt and block with xps.
If you’re going to do that they fill the entire bay with foam.
The idea is to do all the work from the basement where I have access. I would glue xps pieces to the rim joists and the sheathing. Then seal around those with spray foam. Next,fill the remaining cavity with fiberglass batt, then block the cavity with an xps piece and seal that with spray foam. I could also glue a piece of xps to the underside of the subfloor as you show in the new construction diagram above.
Did you mean use spray foam for the entire bay. I was thinking to keep this DIY and moderate cost.
There is a water pipe in one of the joist bays for an outdoor faucet. I guess I need to leave that bay open or at least the area around the pipe clear so it gets warm air from the basement to prevent freezing.
Thank you for replying. I may have not explained my situation well. I don’t think I’d want to fill the entire cavity with spray foam or XPS foam board.
Additionally I want to continue around the basemment and install XPS board against the rim joists and spray foam to seal the XPS to the rim joist and floor joists.
For the 2′ x 12′ cantilever bay window, I was thiking to work from the basement. Glue XPS board to the rim joist and to the bottom exterior sheathing. Seal any gaps with spray foam. That seals off the exterior. Optionally I could also glue XPS board to the underside of the subfloor like you show in the new construction diagram. Then fill the cavity with fiberglass batts. Lastly block off the cavity with XPS and spray foam around that, the joists, subfloor, and concrete wall. How does that compare with your approach for new and existing construction?