Framing A Raked Wall
 Today I finally got a chance to work on framing the walls that will enclose the stairs to my work shop located in the attic above the garage. The walls for the stairway enclosure are more complicated than traditional framed walls. I will be framing raked walls in order for the walls to follow the slope of the staircase. (You can view my previous post on building a staircase if you want to learn more about building stairs.)
Framing a raked wall doesn’t have to be that complicated as long as you plan things out and take your time. Raked walls are very common with cathedral ceilings and along staircases. For me the best way to approach building a raked wall is to make a quick sketch of the wall in order to visualize it and help reduce mistakes.
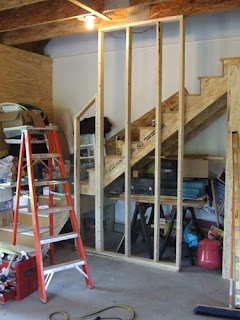
For my walls I’ve got several different scenarios. I’ve got a short raked wall from the first step up to the landing. Then I wanted to have a short piece of raked wall for the first 16 inches so I can make the corner easier with long materials. Then the wall will be full height for about 4 feet. Then the wall transitions to a reverse raked wall (the wall goes all the way up to the ceiling and the raked portion follows the slope of the stair stringer.
 For my raked walls the angle will match the slope of the stair stringers. The stairs were built with a rise of 7 5/8″ and a run of 10″. This allows me to calculate the difference in height of each consecutive stud based on a spacing of 16″.
The math is: 7.625 / 10 = Y / 16 Therefore Y = 7.625 x 16 / 10 = 12.2
So, all you have to do is set up your saw for the angle of the slope = Inv Tan (7.625/10) = 37.3 degrees. Then cut the first stud (the shortest one) based on the starting height you need. Then you cut each consecutive stud 12.2 inches longer with the same angle on the top.
The best way to make sure you don’t make a mistake is to draw the full size version of the wall on the floor. Once you’ve drawn the wall on the floor you’ll be able to check each stud as you cut it.
As you can see in the photo at the top I broke this wall up into two sections. I built the section with the short raked portion first. I’ll post more pictures when I finish framing the raked wall tomorrow.


Leave a comment