

How To Build Shaker Style Cabinet Doors

Building Shaker Style Cabinet Doors with Beadboard Panels
Building custom cabinetry can seem very daunting especially when you consider the doors and drawer fronts. However, with some basic instruction, building cabinet doors and drawers isn’t that difficult. In this article I want to show you how to build Shaker Style Cabinet Doors. Shaker style doors are easy to build using basic shop tools like a table saw, router and miter saw.
Shaker Style
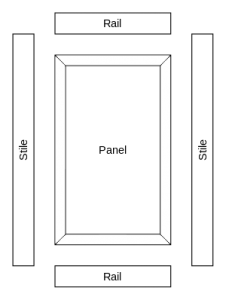
The Shaker Style of cabinetry can mean many things. However in general terms, many people admire Shaker furniture for it’s simplicity, innovative joinery, quality, and functionality. Shaker doors are typically quite plain with rectangular rails and stiles with some sort of plain flat panel. The rails and stiles are normally attached to each other with a tenon and groove detail. The groove on the stile accepts the tenon on the ends of the rails. The same groove also accepts the panel.
 Frame and Panel Construction

Making simple frame and panel cabinet doors is fairly easy and the thing I like best is you can do this either on the table saw or a router table. For this article I’m going to show you how to build shaker style cabinet doors using a table saw. However, you could make the grooves and tenons using a router table just as easily.
To build frame and panel cabinet doors you’ll need to build two stiles, two rails and one panel per door. The stiles run the total height of the cabinet door while the rails run between the stiles.
Sizing Cabinet Doors
The size of the cabinet doors will depend on several factors including: overlay type, single door vs paired doors and the hinge type. For this example I’ll be using Blum 3/4″ overlay hinges. I also have paired doors which means one side of one of the doors does NOT “overlay” the frame.
So for this example we’ll take the overall vertical opening of the cabinet and add 3/4″ to the top and bottom for the stile height. The rail lengths are a bit harder to calculate. Take the total width of the door (opening width plus the overlay on one side or two, if you have paired doors you should also subtract about 1/16″ for a gap) and subtract the width of two stiles. That’s the finished length of the exposed rail, but you also need to add in the length of the tenons on each side. This way the pieces will be long enough once you cut the tenons.
Build Cabinet Door Stiles
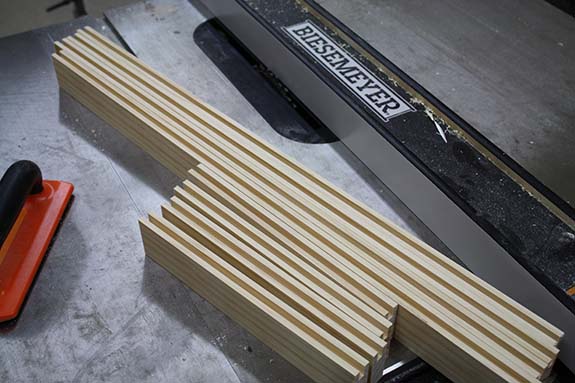
For my cabinet doors I chose to use 2 inch wide stiles that are 3/4 inch thick. The first thing you’ll need to do is rip down the stiles to 2 inches wide. Next cut the stiles to length. I recommend using stop blocks so that each piece of wood is identical in length.
The next step is to cut a dado along the edge of one long edge for a dado. The width of the dado should match the thickness of the door panel. For this example we’re using 1/4 inch thick MDF beadboard. To cut the dado I set up my stacked dado set from Delta for a 1/4 inch wide dad + a thin shim (0.020″). The shim will allow the panel to slide inside the dado and prevent the panel from buckling.
Build Cabinet Door Rails
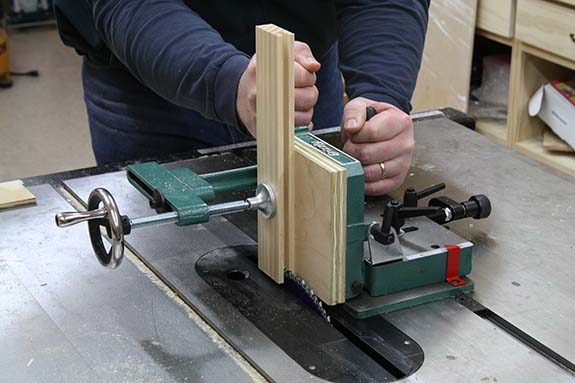
Next rip down additional material 2 inches wide for the rails. Then cut them down to the required length (exposed length plus the length of the tenons). After the rails are cut you’ll need to use a tenoning jig in order to cut the shoulders of the tenons. TIP: cut several extra pieces of the rails when you cut them (including the dado). Then use the extra pieces for fine tuning the tenon so it fits snugly in the dado.
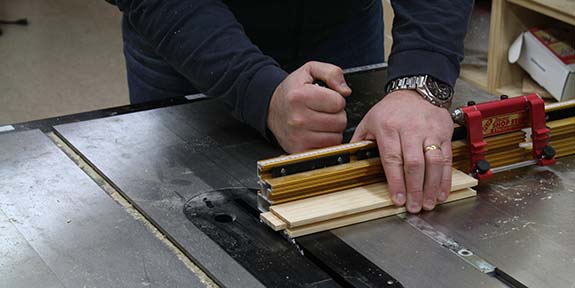
After the shoulder cuts are made with the tenoning jig you’ll have to set up a miter gauge to trim the excess shoulder material off. In the photo below you can see how I used an Incra Miter Gauge with built-in stops to accurately cut all the shoulders the same.
Cabinet Door Panels
The door panels are the easiest part of the job. For this project I used 1/4″ MDF beadboard. Panels can be as simple as a plain board, or as complicated as you like. The door panel is cut so that it’s as wide and tall as the opening in the door frame + the additional depth (-1/16″) associated with the dado. Because my dado’s were 1/2″ deep, I made the panel 7/8″ wider and taller (7/16″ on both sides).
Assemble The Cabinet Door Frame
If you’re taken the time to cut accurate tenons for the door rails the frame should fit together like a glove. Apply a good quality glue (because I’m painting these doors I used urethane glue because it’s so strong) to the rail tenons and the dado where the two pieces mate. Do not apply glue to the door panel because we want that to “float” and not be subject to stresses from shrinkage and expansion of the wood door frames.
As you assemble the frame, be sure to insert the door panel into the dado’s around the rails and stiles. Use clamps to apply pressure to the joints and be sure the door is square before leaving it the dry.
Check out the following video where I show you all the steps for building a Shaker Style Cabinet Door with Beadboard Panels.
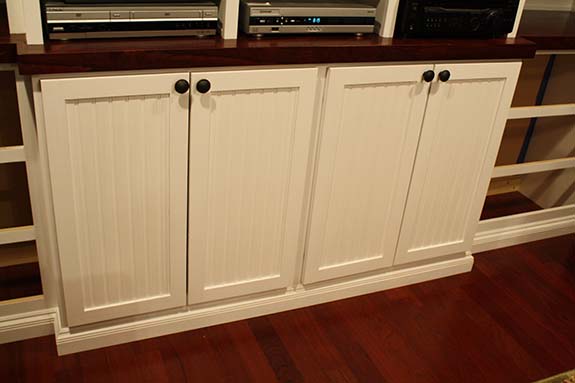
As you can see building a Shaker Style Cabinet Door with Beadboard Panels isn’t very hard. With a few basic shop tools you can build your own doors as well.


Looks great! The finished product that is… The built-in cabinet looks a thousand times better than an entertainment system. Thanks for taking the time to show us how you accomplished the job!
I just built some cabinet doors this way, but after gluing and clamping, one of my doors isn’t quite square and doesn’t fit perfectly against cabinet base.
If I remember shop class from 15 years ago, I’m thinking I might have run the doors through a planer, but I don’t have that option. Any ideas for fixing this?
How much is it out of square? I wouldn’t try to do that with a planer…if it’s only a slight amount I’d likely try with the table saw.