

Improper Deck Flashing Problem

Deck Flashing Problems
Today’s post comes from a reader who asked me to look at a deck flashing problem that he had. The email stated: I’m wondering if you can help me with a problem I am having repairing or replacing the flashing for a replacement deck attached to a stucco house. The original flashing was poorly installed by the builder and over the years has led to wood rot which attracted carpenter ants. The ledger board has been removed and the affected rim boards replaced, but I’m now left with a flashing which needs to be corrected.
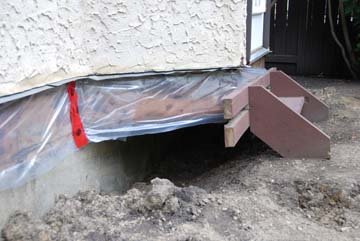
 The sketch was provided by the homeowner and it shows how the existing deck was flashed. The problem jumped right out at me as soon as I saw this sketch. The flashing starts out great, it’s up behind the siding (in this case stucco) and it prevents water from getting behind the stucco. But that’s where the flashing stops working and it doesn’t do anymore good. As you can see in the photo the remaining flashing is quite short.
For flashing to be effective in this application it must go under the decking and over the ledger board (see How To Properly Flash A Deck Ledger Board for more information). The question here is how to fix this problem before the new deck is built.
Add Additional Flashing
The first step should be to apply a layer of self adhering bitchethane to the house rim joist (all of the exposed wood). The next step will be to add an additional piece of aluminum flashing. The flashing should be tucked up behind the existing flashing as far as possible and then bent up/out similar to the configuration of the existing flashing as it appears in the photo.
Install The New Ledger Board
Next install the new ledger board. It would certainly make sense to use a pressure treated piece of lumber for this item regardless of what material the homeowner chooses for the deck. It’s important to counter-sink any fasteners into the ledger board and then caulk the holes with a silicone caulking.
Install Deck Framing
The deck should next be framed into the new ledger board. I find using triple coated galvanized joist hangers the best approach for this situation.
Finish Flashing
The next step would be to bend the flashing down along the face of the ledger board. You’ll need to cut the flashing at each floor joist in order to get the flashing between joists to bend down.
Install Decking
Finally install the decking on top of the flashing where the deck meets the house. I also recommend leaving a gap between the house and first piece of decking. This allows air to get into that space and dry things out.
If you follow this method the deck and house interface should perform very well for years to come.


Looking at picture I think the big issue was that the flash was installed in front of the tar paper (not behind), would the leak will go in between the flash and the tar paper and leaks into the house?
Ideally it would be behind. However, even as it is the water needs to get up and over the flashing so it’s not all that likely.
My builder says pressure treated wood does not need flashing…?
Your builder doesn’t understand what the flashing does. The flashing has nothing to do with the pressure treated deck framing. It’s purpose is to stop water from getting into the house siding and rotting out the sheathing and framing. If he doesn’t understand that I’d highly recommend you find a new builder. Flashing is one of the most basic and fundamental aspects of building. I’d be very suspect if I were you.
not knowing how a contractor applied his knowledge off exterior enveloping can cause more harm in the long run, their are lots off to do the job properly depending on the aesthetics you are looking to achieve ‘, me being a contractor that has pulled more stucco off a wall and found no sheathing left and more mould than insulation i always cut the exterior substrate flash then re-apply new stucco paper peel&stick and lathe, and in most cases after that a sloped foam detail usually hides the cut in the old stucco
major remodel and rot repair specialist. in coastal north Carolina my knowledge of deck flashing is not gained from speculation and advice from others. I have released hundreds if not thousands of feet of deck from houses. repaired sheathing and house bands. Cause? IMPROPER FLASHING. first of all no properly flashed deck needs to be pitched! unless intended to be waterproof over living space below.
(rubber membrane/ concrete patio in high rise)99 percent of water comes down the face of the building. copper or stainless minimum 2 inches up lapped OVER with felt. 1 1/2inches out over deck ledger and 3/4 inches down between joist and ledger with adhesive caulk sealing each section of flashing. NO nails into top of flashing over ledger.
Follow the rain drop Peter :) Thanks for sharing.
In my opinion the flashing doesn’t need to be tucked under the air/vapor/weather membrane that is existing or installed over the sheathing. It can simply not interfere with the assembly by being installed with sheathing tape or self adhered flashing membrane. As for the flashing itself I’m happy to see no drip edge because it would get flattened anyway (a lot of online details don’t understand that the drip edge cant go though joists). in this case I am assuming flashing is installed to prevent pooling of water at the interface of wall and deck ledger?