Miter Joint Shrinkage Explanation
Miter Joint Shrinkage – Why Miter Joints Open Up
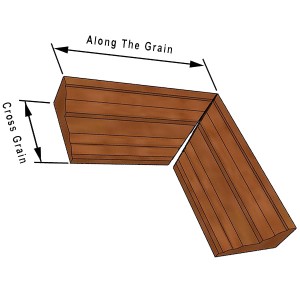 I’m sure everyone has seen a miter joint that has opened up similar to the one in this image. I’d like to explain why this type of miter joint shrinkage happens so that you can try to avoid this unsightly problem.
To understand this problem you first need to take a minute to understand how wood is “structured”. It’s easiest to think of wood being composed of lots of very small tubes all tightly packed together. Those tubes run parallel to the direction of the grain.
As you can see in the diagram the cross section of wood resembles a bunch of straws with the pores running in the direction of the grain.
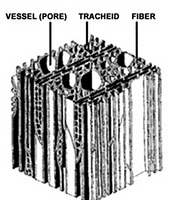 Now, those pores are filled with water, the moisture content of the wood changes depending on the time of year and the relative humidity. When wood drys out the tubes get narrower and thus cause shrinkage in the cross grain direction. There is very little shrinkage along the direction of grain. The “straws” don’t get shorter but they do get narrower.
So now take the fact that most of the shrinkage occurs in the cross grain direction and look at the picture of the miter joint. The tip or toe of the miter joint is very narrow in the cross grain direction. The heal of the miter has the full width of the board in the cross grain direction. Therefore, as things dry out there is more total shrinkage at the heal of the joint. Very little shrinkage will occur at the toe of the joint. In addition, there will be little to no movement in the longitudinal direction (along the grain).

Use Different Joint Types To Minimize Shrinkage
Obviously miter joints can’t be eliminated for trim with profiles. However, trim material that’s flat stock is best joined at a corner with the butt and pass method. The butt and pass method will all but eliminate seasonal movement of the joint. To see how I like to do butt and pass trim using pocket screws check out my article: Butt and Pass Pocket Screw Window Casing. If you must use a trim material with a profile then make sure your wood is acclimated to the surrounding humidity levels and try to prevent large changes in humidity within the house.
You can also use a biscuit joiner to structurally reinforce miter joints to help prevent joint shrinkage.





Todd, I totally learned something on this post. Very nice. I actually had no idea why this happened.
@ Fred – I learned this at a seminar a couple of years ago and thought it was pretty cool…I always want to know why….
A really great blog post that clearly explained something that I’d had trouble with in the past. Thank you so much for sharing! :D
Would it help at all to put a coat of varnish on edges of casing
after cutting the miter ?
Hard to say….might slow it down but likely not prevent it completely. Worth a shot.
Great information. Thank you but I was surprised you didn’t mention glueing the joint. I have always done it that way and have had little trouble with this issue