

Outfeed Table for Delta Unisaw

Custom Outfeed Table Built To Match Unisaw
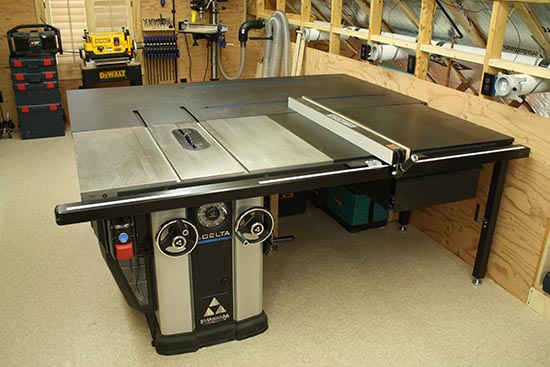
Outfeed tables are one of the most useful companions of a table saw. They making cutting large sheet stock easier, safer, and more accurate. In addition, they often serve as an assembly table and storage cabinet. In this article I’d like to share a design that I created for an outfeed table that matches my Delta Unisaw.
Outfeed Table Design Features
My shop is limited on floor space so every inch really does count. Due to that limitation I also wanted this outfeed table to serve as an assembly table. (Note: in a perfect shop setup it’s ideal to have a separate dedicated assembly table, this way you can still cut materials at the table saw without moving everything from the “assembly table”.) For my outfeed/assembly table I wanted it to include the following features: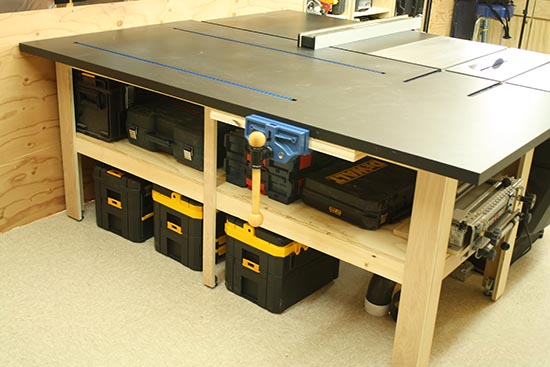
- Large Flat Surface – The table needed to be large enough such that I can rip cut an 8′ sheet without the sheet “tipping” over and falling off the table. Essentially the table has to be wide enough so the outside edge is more than 48 inches from the back of the saw blade.
- Durable Surface – The table needed a durable surface that’s also smooth so materials can easily slide along the table when then come off the Unisaw.
- Sturdy and Strong Design – The table had to be strong enough to support large projects, heavy sheets of wood and hold those materials without much movement.
- Bench Vise – Because this table is also my assembly table and general purpose workbench it needed a vise.
- Hold Downs – clamping items to a work bench or assembly table is essential because most clamps cannot reach around the large table surface.
- Vertical Adjustability – Outfeed tables need to be adjusted such that they are precisely level (or just lower and level) than the table saw surface. If the table is higher at all it could cause a nasty kickback.
- Storage – Last but certainly not least is storage. Outfeed tables can take up lots of valuable floor space. For this table I wanted to have plenty of easy access storage for tools, jigs and materials.
The Frame/Support Base
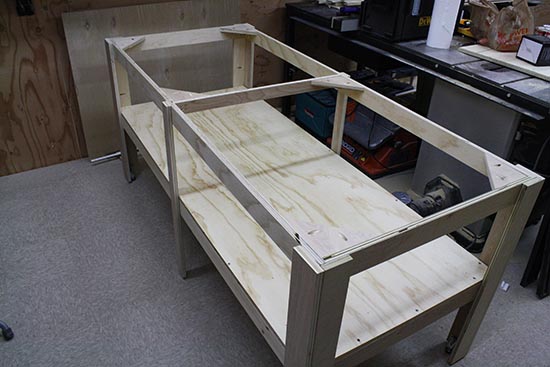
A majority of the frame was built with scrap 3/4″ cabinet grade Birch plywood. I have lots of it hanging around the shop from a recent cabinet project so it was a great way to use it up. First I built legs using 3-1/2″ wide pieces of plywood. I used my Kreg Jig to screw them together in an L-shape. I calculated the height of the table to match the table saw and then subtracted 1 inch (so I could install adjustable leg supports for fine tuning the table height). For the center two legs I used single pieces of plywood so they would not interrupt the middle shelf.
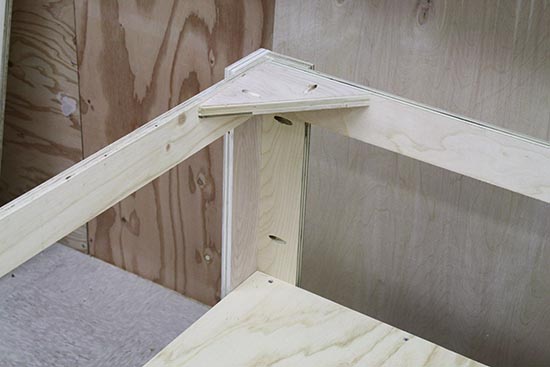
In the photo above you can see how the legs are pocket screwed together (Kreg Jig). After building all the legs I cut 3-1/2″ wide support rails for the top and middle shelf. These are screwed to the inside of all the legs. The middle shelf consists of one layer of 3/4″ plywood screwed down to the lower rail supports.  I positioned the middle shelf at a height so that my DEWALT TSTAK organizers would fit just below it. Lastly you can see I installed corner supports again using pocket screws. The supports not only help keep the frame square but they also gave me a location to screw the top to the frame from below.
Each of the legs has a heavy-duty adjustable leg attached to it. These allow me to level the top with respect to the table saw. I keep my outfeed table approximately 1/16 of an inch lower than the table saw cast iron top. I do this to avoid any chance of wood on the table saw hitting the leading edge of the outfeed table and causing a binding situation. Obviously that would be a very serious situation and one to avoid at all costs.
Outfeed Table Top
The top for the table is built from two layers of 3/4 inch thick Birch plywood. I glued and screwed the two layers together prior to cutting it the the final size. This table is approximately 42 inches deep and 71 inches long. The length was set to match the end of the Unisaw. I set the depth just wide enough to allow me to rip an 8 foot long piece of plywood and have the center of gravity still on the table. Bigger would be better but I can’t afford more space in my shop so this will work fine for most applications.
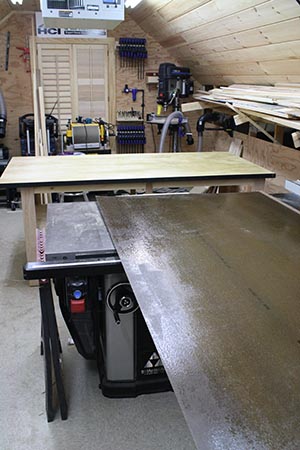 I cut the 2 layer top to size using my DEWALT TrackSaw. The TrackSaw let me get very crisp clean cuts that I needed in order for the laminate to adhere properly to the plywood.
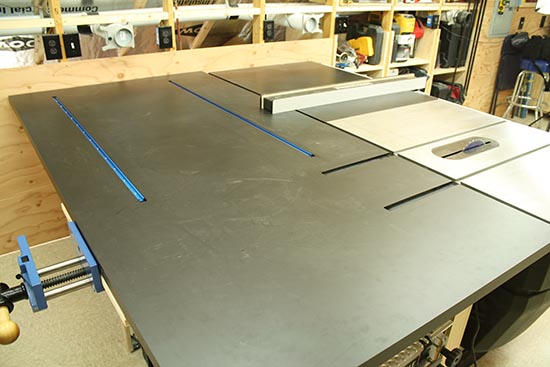
Next I cut and installed the laminate (Formica) top. I chose the laminate for several reasons. First and foremost I was trying to match the side table on my Delta Unisaw which came standard with a black laminate top. Secondly, laminate is very tough and able to withstand the beating this table will take in the shop. Lastly, it’s fairly inexpensive and easy to install.
One important detail to consider while making the top are slots for the miter gauge T-bars. When you push a miter gauge (or other jig with T-Bars) forward towards the outfeed table it would eventually hit the outfeed table. To account for this I routed some 3/4 inch wide slots through the laminate and into the table. The slots are slightly deeper than the T-bars. The slots is ONLY there to allow the T-bar to clear the table top. You DO NOT need to make the slot match the T-bar.
Hold Downs / Table Clamps
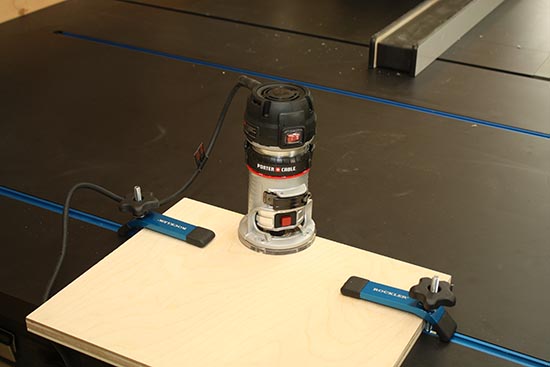
Working in the wood shop means working alone 95% of the time. That’s one reason why jigs are so important in the shop. To maximize the flexibility in the assembly table I installed two lengths of Rockler Universal T-Track. The T-Track allows me to clamp down jigs, work pieces, tools, fences and templates. The flexibility is endless and installation was straight forward.
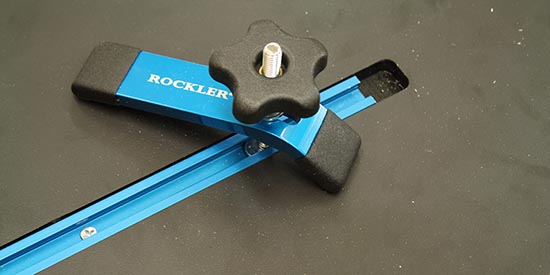
Installing the T-track was easy. I built a simple jig for my router that allowed me to route a straight line slot in the top (laminate and wood at the same time). I used a Straight Cutting Router Bit. As you can see I cut the slot a bit deeper than the T-track (so materials do not catch on it) and I cut the slot longer. That extra space beyond the track is there I can insert the T-bolts and remove them from the track. Before installing the track I painted the slots black to match the top.
Bench Vise
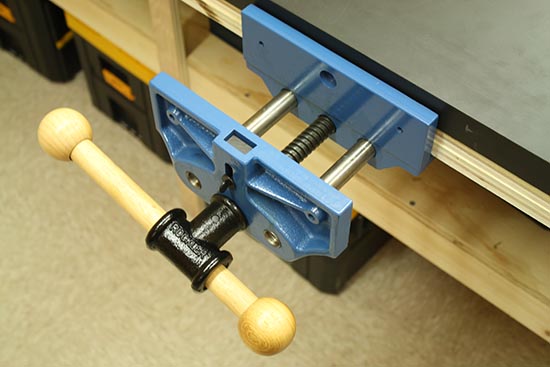
The new outfeed table / assembly table also includes a new bench vise. Having a large size bench vise was huge on my list of needs in the shop. I’m very pleased with the 9 inch quick release vise from Rockler. The vise is built with quality materials and works great. I really like the quick release feature. I plan on lining the two jaws with some harwood.
Project Cost and Time
This project cost about $300 to build with the exception of the vise. It took about 8 hours build the bench and get it level. This is certainly a project that anyone with intermediate woodworking skills can handle.


Nice work. Thanks for the detailed photos.
Nice Job! Looks clean. One quick thought: I might have recessed the vice enough to allow for a hardwood jaw to be flush with the edge of the bench. That can be helpful for clamping longer stuff.
Joe – The vice actually is mounted such that I can install a hardwood jaw flush to the bench. I just haven’t done it yet. Vices are one of the un-sung hero’s in every shop.
I’d love to see how you did this? The designs I’ve seen that are flush require cutting out part of the table to mount the back face in I think.
A friend built a similar out-feed table for his saw. He routed narrow slits across a portion of the top and built a box underneath the openings. He attached a connection to his dust management system to provide a dust collection sanding surface. It is another way to achieve a multi-use surface.
Wow! That looks awesome…nice job! I may have to steal your ideas to make my own version.
Would love to see pictures when you finish it!
This is a truly useful idea. When I built my second workbench years ago, I built it 1/16″ lower than the tablesaw, as per this article. I have a lighter saw (but still on it’s own permanent legs) and move it to the end or front of the freestanding bench, as needed, by tipping it from one side and kicking a mechanics “creeper” under the legs on that side. Then I go around to the other side & push/pull it to the position I want. As the author points out here, it feels calm and safe when ripping or crosscutting big sheets of heavy material (can you say 3/4″ MDF?) that doesn’t tilt, tip, or other wise feel in the least “hard to control”.
Even if your table isn’t as elaborate as the one in this article, I can assure anyone reading this that idea of a large outfeed table is an OUTSTANDING one!
Very nice… Appreciate you sharing your ideas and successes.
Thanks,
Mike
I love this design and am in the process of building an almost identical one for my SawStop (which glossy black Formica to match the side table). I think I’m even going to add some dog holes in front of the vise (and past the miter track slots) and also put a router lift and removable fence in the other corner. Then on the lower shelf I’ll put my Shapeoko CNC.
One question I have is how much smaller is the lower table than the 72×42″ top? Or how much does the top overhang the aprons on all sides? I’m curious how far the top (two pieces of 3/4″ Baltic birch glued together with 1/16″ laminate) can cantilever over the edges since I imagine being able to clamp from the sides is useful (besides the T-track clamps). Or will clamping crack the laminate? Thanks again for the great article.
Mark – The top overhangs 3″ on each side and it’s plenty strong. I clamp stuff on the sides all the time, and never any issues with the laminate. Good luck!
Thanks again, Todd! I’d love to show you a picture of how it has turned out but I don’t see a way to put photos in the comments. Anyway, I’m incredibly pleased because it looks great and has already proved incredibly functional. I added a router table into the extension of my Sawstop so it all looks like one big design. Now I just need to add the T-track and Rocker 9″ vise, both of which I have sitting on it. I’d love to see how you mounted the vise. In the photos it appears the top of the vise sits about an inch below the table top, but I”m assuming you had to cut through the apron to allow it to fit? Would it be possible to post any pictures from beneath the vise so I can see what you cut through and how you’re able to get the back jaw flush with the edge of the table? It also looks like you installed two 4′ sections of T-track – I’m trying to gage from the picture how far in from each side of the table the track sits. Thanks again for the amazing design and post.
Thanks, Todd. My table turned out terrific – almost identical to yours but 68″x42″ and glossy black. I’m about to add the 4′ T-track sections and am curious how far from the edges and apart you installed the two tracks? It looks like about 1o” from the front and back, which would mean about 20.5″ in-between? Also did you glue or epoxy them in or just use screws?
Mark – Glad your table turned out great. If I think of it i’ll try to measure mine, but I believe they are roughly 24″ apart. I just screwed them in and they work great. I use them all the time!
You had asked about the vice. I laminated additional plywood to the bottom of the table, and lagged the vice to the bottom.
Awesome build…Thanks for sharing. I don’t know how old this article is or if it is even monitored anymore…but i have a question. What kind of fence system do you use with this setup? Looks stout. Thanks.
My fence is the Beisemeyer fence. They are great!
http://www.deltamachinery.com/accessories/biesemeyer
Great job I’m planning an 8′ X8′ table for a new shop. Can you tell me where you got levelling feet and the brand name of them.
I purchased them on Amazon