As I pointed out recently we’re going to be writing several articles about how to install a tile backsplash for kitchens. Our first article focused on selecting a tile backsplash so for this article I’d like to discuss how to lay out a tile backsplash. In a perfect world that backsplash would be a length that’s a perfect dividend of the individual tile lengths. Furthermore in a perfect world that major appliances, windows and architectural features would also fall perfectly on the tile lines. Well folks as we all know nothing is perfect especially when it comes to construction.
They say a picture is worth a thousand words and that’s so very true when it comes to a sketch! There are several ways to create a useful sketch from using graph paper to a full blown CAD drafting software. The reality is a piece of graph paper can work just as well as anything. For this project I’ve decided to use Google’s Sketchup because it’s a piece of software that I’m used to.
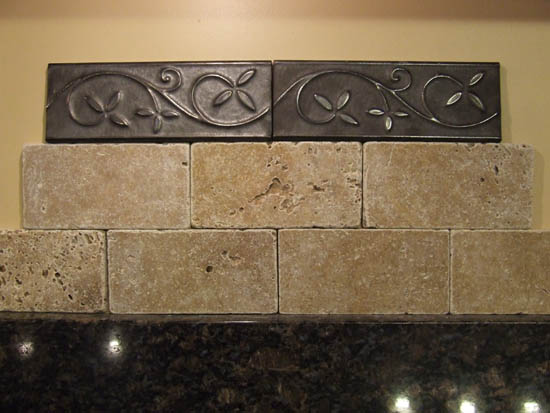
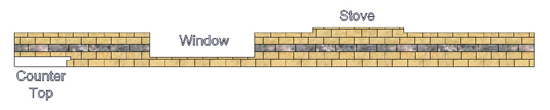
The tan tiles represent the 3 inches tall by 6 inches long tumbled marble tiles and the gray represents the accent tiles which are 2-3/4 inch by 8 inches long. Vertically there wasn’t much to decide, I’ve started with full height tiles along the top of the granite backsplash. Then I follow with another 3 inch tall marble tile, followed by the 2-3/4 inch tall accent, followed by another full marble tile and then a partial tile cut to fit.
For this layout the trick was working with the staggers between the 6 inch wide marble tiles and the 8 inch long accent tiles. After playing with the design it seems to work best by starting the full 8 inch tiles on either side of the window and working towards the ends. What I wanted to avoid was having grout lines match up and this design creates that look.
As you can see this can be quite complicated. The key is to take your time and try different layouts. It’s much easier to figure this out on paper instead of putting tiles on the wall and then tearing them all down. Once you’ve come up with the design that you like you can use the sketches to transform the design onto the wall with pencil as a guide during the installation.
If you’d like to see the final pictures of our new backsplash along with a summary of all the backsplash articles then visit our complete guide on how to install a kitchen backsplash.
Which is Better a Stick Nailer or Coil Nailer? Framers have many choices in nailers…
Estimating How Many Nails for a New Roof When it comes to estimating materials for…
Composite / PVC Decking Layout Tips and Advice Composite and PVC decking have really changed…
Benefits of ERV Systems (Energy Recovery Ventilator) If you're building a new home or doing…
Vermiculite Attic Insulation If your home was built before 1990 there is a chance it…
Arc Fault (AFCI) Circuit Breakers Tripping Often An arc-fault circuit interrupter (AFCI) or arc-fault detection…
View Comments
Really good points for planning a backsplash. We help our clients with this and it does take careful planning. Yes, choosing the tile is the fun part. Making it work for the dimensions of the backsplash is sometimes a challenge. You can not emphasize planning too much!
Todd,
Nice post I'm looking forward to seeing your choices. I love the Travertine sub way tiles.