

Basket Weave Cutting Board

Step 7 – Final Fit
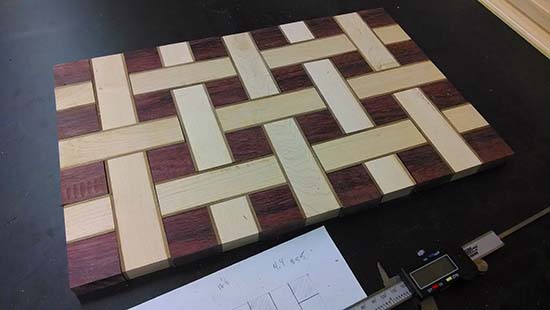
Before you glue-up the cutting board it’s really important to do a full dry fit and clamp it. This is the best way to check to be sure all the joints fit well. If you need to make a minor adjustment I recommend using a benchtop disc sander. If a particular row is messed up you can always use that “spare” piece I mentioned.
Gluing Up Basket Weave Cutting Board
The next step is gluing up the cutting board. Because of the pattern involved with this cutting board you really need to glue up the entire board at once. This isn’t easy and you really need to be prepared before you begin. I highly recommend that all the pieces have a visible number on them that matches your sketch.
I found the easiest way to clamp this type of cutting board is by starting with two “backstops” or straight pieces of wood clamped to a bench at 90 degrees to each other. This will ensure that the cutting board is square (you can’t trim this type of design after to get it square!).
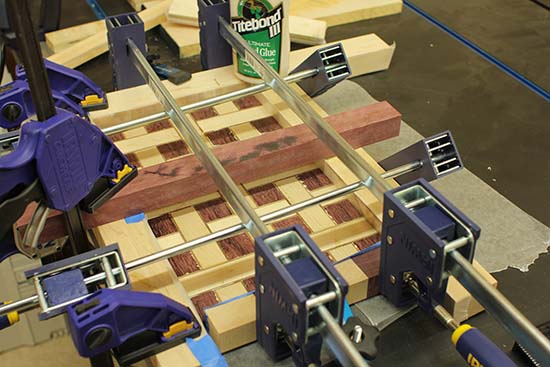
Working quickly apply generous amounts of wood glue (I use Titebond III) to the edges of the pieces as you assemble the pattern. Work from the corner of the backstops and quickly move so the glue doesn’t set up on the first pieces before you get them all done. I use scrap pieces of wood with painters tape on them as culls to keep everything tight and also to keep the board flat. I do my clamping on my outfeed table that has built-in T-Track so I can clamp the culls down to keep the board flat.
TIP: Parchment paper works very well for keeping glue from sticking to your bench. I find it works even better than tape, wax paper or plastic wrap.
Sanding and Finishing Basket Weave Cutting Board
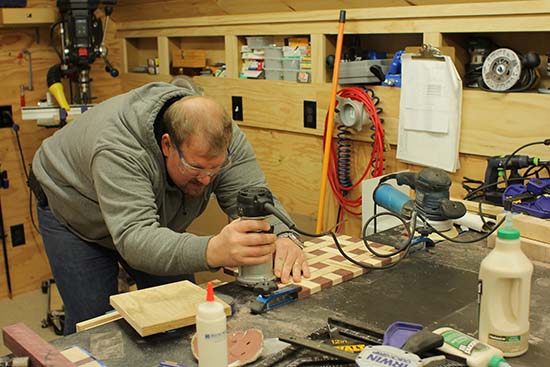
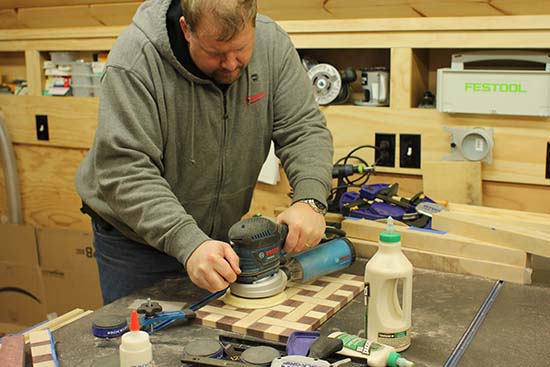
Finishing the basket weave cutting board is pretty straight forward. First I used a card scrapper to remove all the dried glue squeeze out. Then I used a random orbit sander with 80 grit paper to smooth things out. Next I used a 1/4″ round-over bit in the router to put a nice simple edge on the all sides of the cutting board. Finally I finished sanding the board with 120 and 200 grit sand paper.
Finally after all the hard work I applied a finish to the cutting board. Let me preface this section by saying there are dozens of ways to finish a cutting board. This particular cutting board will see very light duty and probably be more of a show piece in the kitchen than a work horse which certainly played a part in the finish I chose.
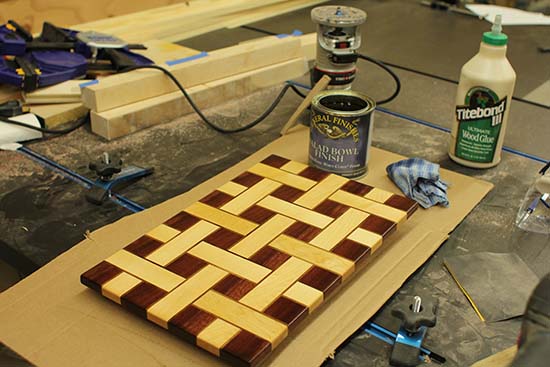
For this cutting board I used a Salad Bowl Finish from General Finishes. If you’re going to use the board a lot you might want to use an oil finish. However, I’ve used this finish on other cutting boards with great success. As you can see the finish really helps bring out the natural beauty of the wood that I selected and made the cutting board look more like a piece of art than something as utilitarian as a cutting board.
This type of finish can be re-applied later to revive the appearance. Best of all it’s food safe and it will keep your board safe from water damage when you wash the board. I hope you enjoyed this article and find it useful. Making cutting boards is a fun woodworking project!


I am an experienced cutting board builder and I can honestly that is one of the coolest designs I have seen in a long time. At first it looks like it would take for ever but once I read the instructions it realized any one with adequate woodworking skills could build cutting board. I urge all of the readers interested in building a cutting, try this one and than you can tell everyone that you have your very own handmade custom cutting board, and you made it yourself.
I wish I had found your video a month ago. I am currently sanding out a basket weave bowl, cut on a scroll saw. My three glued up pieces ended up being slightly wider than planned, but I wasn’t smart enough to run them thru the table saw. That resulted in having to adjust the squares. Glue up was a disaster. I started in the center and worked outward. After that mess I figured the best approach was to use a 90 degree form, like you did.
I would have liked to have seen another shot or two of your finished glue up. I wanted to see how you clamped it all together.
Thanks for your video as it answered a lot of my questions.
I like your work and it is pleasing to know someone can share there good work,I will be making this board as I have made a few others,thankyou.
Hello, I have a question regarding the sizes of the wood you need to cut before, I made a model in Sketchup but when I add the sizes and look at it, it the thin strips of the walnut wood do not feel like 1/4, The walnut wood looks a bit too thick, I would like to check before I attempt to make this if the thickness for the walnut is 1/4 or if it is less.
Thanks,
I believe mine were about 1/8 to 3/16″ wide…certainly not 1/4″
any issue with grains going different directions
Not at all…still looks like new!
May I post part of this on my personal blog if I place a reference to this website?
Monsoon http://www.monsoondressestore.com
Sure
Beautiful board. I’m going to start one tomorrow. This will be my first basket weave board. I build end grain boards. Just curious. Have you run the finished board through a planner? Wondering if the different grain directions would plane ok.
I was thinking about it and decided I didn’t want to risk all my hard work.
Nice, Im getting to work on this today. I have everything planned out and I’m using purple heart, walnut and oak. Thanks for the great tutorial!
Great timing Todd. I’m making Christmas gifts of all kinds. Cutting boards were definitely in the mix. I enjoyed your step by step instructions including the tips! My only wish was for some pictures together with the text. I’ve always been a visual kinda guy, I can build just about anything if I see it I can build it.
I’m still going to give it a shot because the end result is awesome. So thank you for your time, great job!
Jason, is there anywhere to see your finished result?
Hi Todd,
I just made one from maple with cherry edges, with walnut for the cross squares. I just took it out of glue up and there are 2 hairline light gaps between a few squares. I ran all of the pieces through my tablesaw during one operation with no change to the fence. So the squares are all the same size and the longer pieces are equally wide. How did you get the longer pieces to be exactly three times the length? I think that is my issue.
Great job
What blade did you use on your table saw??
Thanks
It’s likely a Diablo (I honestly can’t remember), fine blade.
When you did your glue up did you have time to spread the glue evenly or did you not ?
Very nice work.
Plenty of time. The glue doesn’t set up that fast.