

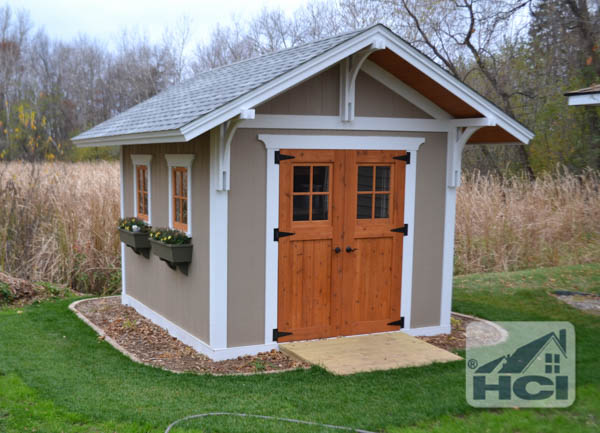
Build A Shed Series Part 3| Build The Foundation

Build A Shed Series Part 3| Build The Foundation
In part 1 of the Build a Shed series we covered finding out what rules and codes apply in your community, finding a good plan, and getting a permit. In part 2 of the Build a Shed series we covered utility locating, materials ordering, and finally site preparation. In part 3 we’ll cover grading the site and building the foundation.
Marking the Shed Location
If you remember from part 2, we left off with just having cleaned and grubbed the site. If your lot is level then you can return the heavy equipment. If your lot is sloped like mine than keep the skid loader around for this step. Before you just start ripping into your lawn with the tractor it is important to locate the boundaries of where you want to build a shed and mark it with a string line where the stakes extend well past the ends of the excavation area. I set my string directly over the outside edge of where I wanted one of the 6×6 skids to go. The math for that is the offset from the property line to the outside wall of the shed plus the distance the skid is in from the wall.
Using a Laser Level
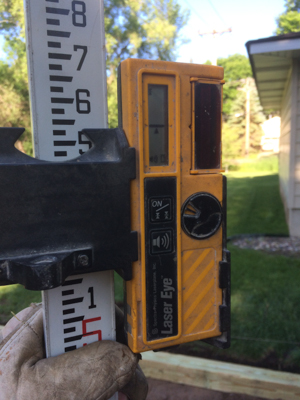 I built the shed at the corner of the lot where it sloped down towards the swamp. I knew it went down hill but it’s hard to tell how much because your eye can deceive you a little if the change is gradual like mine was. Using a laser level to check the site will show you where the soil needs to be cut down and where it needs to be filled in. A laser is level is a tool that contractors use to get their site and building completely level. A decent one has a margin of error of about +/- 1/16″ over 100′.
There are 4 components to a laser level setup, a laser, a tripod, a grade stick, and the receiver or target. If you don’t have a grade stick like the one pictured a straight 1×3 works very well.
The first step to using it is to set up the tripod a safe distance away from the work site that has line of sight to the whole work area and mount the laser to the top. Turn the laser on and then mount the receiver to the grade stick. If you’re trying to match grade to a known point, set the grade stick on that point and slide the receiver up and down until it has a solid tone and shows a horizontal line like the picture to the right. The laser is now set to the grade of the known point.
If you’re trying to determine the change in grade for the work area set the grade stick to the high point and adjust the receiver until it has a solid tone and has a horizontal line on the display. Next take the stick around the work site and suspend it in air until it tones solid and observe the distance from the bottom of the stick to the ground. This way you can see what the change in elevation is around the work area. If you’re looking to pick up a laser level for your own use, take a look at the Bosch GRL 500 HCK Rotary Laser we reviewed over at Tool Box Buzz.
Grade The Site
After running the laser around, I knew what areas need to be cut down and what areas needed to be filled in. I used the skid loader to shave off the dirt on the uphill side and push it towards the low end. If you don’t have a lot of equipment experience it can be hard to get it level with just the tractor. Have a garden rake and flat nose shovel handy to move the dirt around to get it closer to level using your eye. After moving the dirt around a bit and close to level, reset the receiver to the elevation of the bottom of the skid and check the area again. After it’s leveled, be sure to tamp and compact any soil that was disturbed.
*Note about fill – My site used to be a swamp that was filled in many years ago with sand and gravel. It makes for a great base for the shed but you may have to bring in a little sand or gravel under the skids.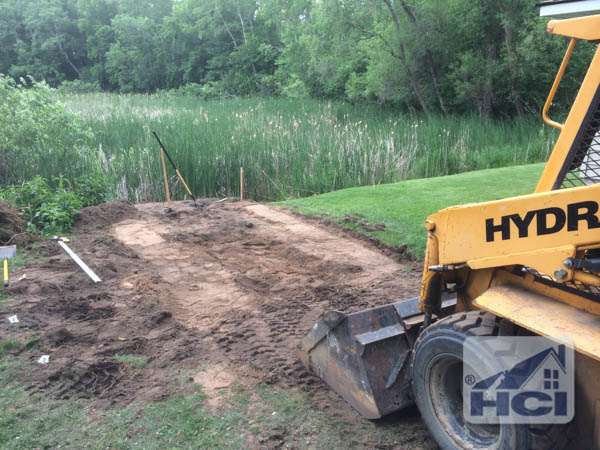


Very nice looks great . best way to utilize your place