

Building Wood Raised Bed Vegetable Gardens

Raised Bed Vegetable Gardens
Growing fresh vegetables is something I’ve done since I was a kid. When I was a kid we had a huge garden that took lots of hours and hard work but provide our family with all the vegetables we needed. With my family’s busy schedule a huge garden isn’t a viable option for us so we decided to build some smaller raised bed gardens.
Raised bed vegetable gardens are an excellent option for people with small yards, yards with poor soil conditions, or yards with poor drainage. The raised sides of the garden allow for a suitable depth of soil, better drainage, and better access to vegetables.
With some basic tools and materials you can build raised bed vegetable gardens in your yard and start your own garden. It’s an excellent family activity and the “fruit of your labor” are great organic vegetables at a fraction of the cost.
Raised Bed Design
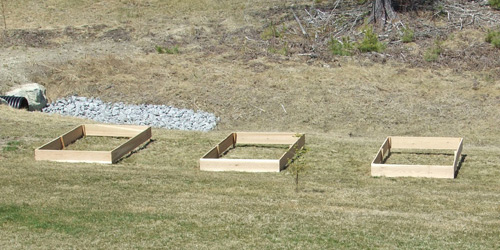
 After doing some research we decided to make three gardens 10 ft long by 5 ft wide. The 5 ft dimension allows easy access to reach into the beds without having to crawl into them. Each garden will be 50 sf which isn’t huge but can certainly hold quite a few vegetables.
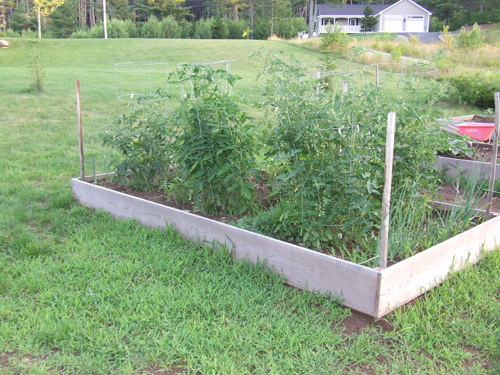
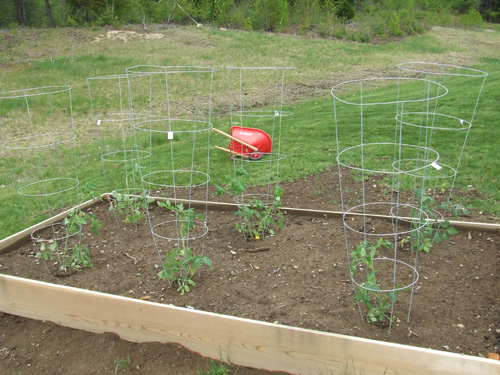
For example, in one garden we are able to plant 8 tomato plants, in another garden we are able to plant 6 string bean plants along with 12 lettuce plants. With several raised beds you can plant quite a wide assortment of vegetables.
For this design I chose to build the boxes out of 1×10 cedar with 2×2 posts in the corners to secure it to the ground. I chose cedar because of it’s natural resistance to decay when exposed to the elements. It’s worth pointing out that it’s not a good idea to use pressure treated wood for vegetable gardens as you run the risk of contamination from the preservatives in the wood.
The corner posts serve two purposes, first they provide an effective way to stake the box to the ground, and second they provide extra material to screw the side boards to and stiffen the corner.
Construction & Assembly
 These raised bed garden boxes are really easy to do and require basic tools. This project took me about 3 hours from start to finish.
First I used my sliding miter saw to cut the cedar boards to length (you could use a simple hand saw to cut them). Then I pre-drilled three holes in each board, then screwed them together using 2-inch long stainless steel screws. Stainless steel hardware is the best product to use with cedar (galvanized will stain). I screwed the entire box together before going to the next step.
Next I drove 2×2 corner posts into the ground several feet at each corner using a sledge hammer. Once the corner posts are installed I used a long builders level to level the box. Start at the highest grade level (corner of the box that touches the ground) and screw the box to the corner post. Then work your way around the box leveling and screwing the box to the posts.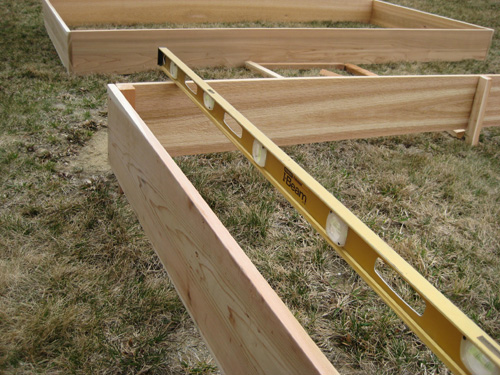
You may need to fill in some extra soil on the outside of the box in areas where the grade falls away from the bottom of the box. Finally cut off any extra length on the corner posts so they are flush with the top of the 1×10’s.
All that’s left to do is fill the boxes with good quality loam (soil) along with some fertilizer and you’re ready to plant the garden.


You’ve done a nice job there. I’m also considering some raised beds, but I’m wondering how deep they actually need to be? The soil here is poor quality, so I’d rather have a reasonable depth raised – but I don’t know much much veg needs.
Cheers,
Ian
@ Ian – I just started putting soil in last night. I’ll end up with about 8″ of soil above the nature grade.
fyi… due to the harshness of the New England winters & the thawing, some people had warned us that the spring may be rough on the corners of the raised beds. we went w/ metal corners sold by Gardner’s Supply (a super site for any veggie gardner)- you simply buy the appropriate height corners for your boards, slide the boards in & VIOLA!!!
http://www.gardeners.com/Raised-Bed-Corners/Landscaping_RaisedBeds,11892,default,cp.html
Do you not need to have a bottom base for the raised bed box? We are about to build one and it seems a bottom is necessary to avoid weeds growing from the existing soil beneath.
@ Ruth – No bottom…you want good drainage. If you’re worried about weeds then you should remove the turf first.
Ian –
We made raised bed frames in our previous house and are making new ones tomorrow. We’ve made them like the one above using three 2X12X12 boards (one cut in 1/2) and some with 6 4x4X8 landscape timbers (2 cut in 1/2).
To answer your question directly, you’ll want it 10-12″ deep if you are growing vegetables and are lining your garden with landscape fabric. If you do “lasagna” gardening, or other types where the plants’ roots will go into the ground, then you can go with 8″. I don’t recommend going more shallow than 8″ for vegetables because they need the drainage, or 6″ for flowers because the grass will creep into your frame.
You say that you made your bed 5 ft. wide and 10 ft. long, giving you 150 sq. ft. of planting area. Wouldn’t that be 50 sq. ft.? I thought you multiply the length by the width to get the area, but perhaps I am in error.
Nancy – I built three beds, sorry for the confusion, 3 x 50.
Todd, nice post. timely for me. Thanks
I am going to be using cedar to build my raised garden bed. Do I need to treat the wood with a stain or water repellant?
Ryan – Cedar is naturally rot resistant. It’s best that you not use any chemicals due to the vegetables.
Did you dig out the grass before you planted your garden, cuz the grass would come up into your vegeies, Right?
VK – We didn’t do that actually and there was no problem. However, we installed probably 6 to 8 inches of soil which pretty much killed the grass below.
My raised bed veggie garden is 20″ deep. I have a terrible gopher problem, so I was wondering whether I could fill the bottom 6″ of the bed with 3/4″ rock as opposed to hardware cloth, which would eventually decompose. I am also wondering whether rocks would be less expensive “filler” than the 50% compost 50% weed-free soil I’d add for the remaining 14″ of the bed’s depth.
Clayhalo – Not a bad idea. What about some type of plastic fencing? It won’t rot and I have a feeling gopher won’t like it much!
To keep the Gophers out, I would try lining the bottome of the boxes with chicken wire.
Glad you went the high road with your Cedar planks. If you go any taller a stake may be needed in the middle of the long boards to keep them from bowing out. I made a bed 2 years ago from 2×10 and needed the stakes only in the middle.
I have to comment tho, you are perpetuating the myth about PT lumber. PT is fine for garden beds as long as you choose new construction PT. The Government outlawed CCA, which had Arsnic and Chromium, for any residential (nearly all use actually). Some people think Creosote is still widely used in PT too.
All the new PT use some form of Sodium Borate or copper. Tests have shown the leaching of the copper is nearly non existent, and even if the little bit leached is a concern one only has to remember that copper is not toxic. I did a ton of research on it before building mine.
By the way, plastic fencing is nearly useless against gophers down here in Mass… chew right threw it. Chicken wire or hardware cloth are best options. Unless your in a really acid soil or very wet region, the galvanized wire should last a long time under the soil bed.
Adding any rock under the soil will produce a negative impact on soil drainage – another myth still perpetuated is adding course material in the bottom of containers to aid drainage. It actually results in the soil becoming saturated before draining. Its physics relating to the different densities.
I used stakes at mid-point…..seems to work very well. I tend to agree with you on the PT…but I’d prefer to be safe than sorry. Thanks for the informative input.
as we get older it makes more sense to bring the garden up to us instead of us going down to the garden… we used 4″ x 6″ p.t. timbers to frame our elevated beds and built them up to 42″ high. we lined them with 6 mil poly to protect the vegetables from the p.t. lumber. Having them at that height makes it a joy to work the beds. we also limited the width to 32″ wide to make them accessible from both sides. Here in the Okanagan valley in British Columbia (the Okanogan in Washington) ground level tomato beds are susceptible to tomato hornworms but with our elevated beds we’ve had no problems. and with that depth of soil we have no need to rotate crops from year to year
I’m considering making a raised bed this year, but wondering if you purchase soil for your raised beds at a place like Home Depot? Any particular kind of soil? Sounds like it could be awfully expensive. Thanks –
Just order topsoil from a landscape supply place. MUCH cheaper.