Stone accents on the exterior and interior of a home add a great architectural upgrade and increased home value. However, hiring a mason can prove frustrating and extremely expensive today. Often times I have a hard time finding an available mason when we build homes for a client that wants real masonry accents, fireplaces, and chimneys. And when I’m lucky enough to find one the cost is very high and often prevents homeowners from realizing their design dreams.
I recently used a new product called ClipStone which eliminates the need for a mason, and offers lots of flexibility and options for residential and commercial applications. ClipStone is a mortarless stone veneer product designed to be installed with basic tools. It can be used on the exterior or interior of buildings and offers a 50 year limited warranty.
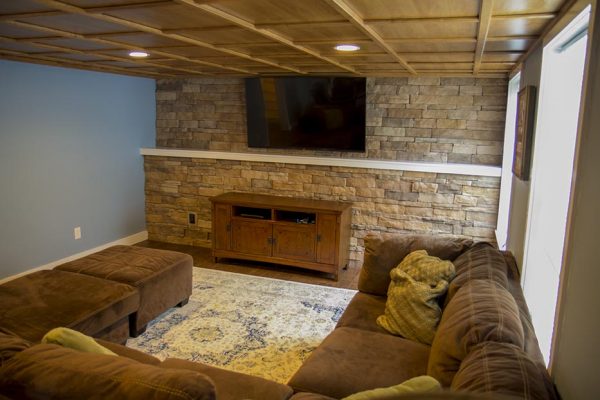
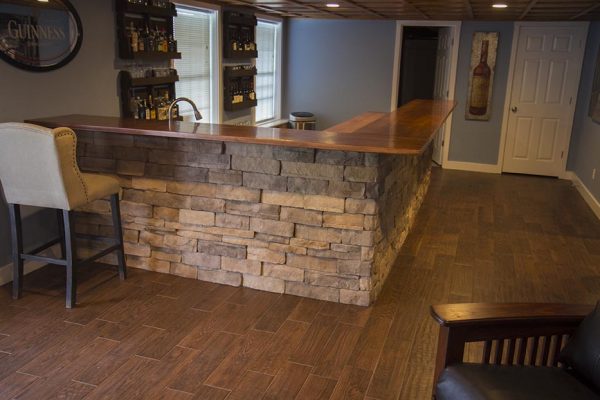
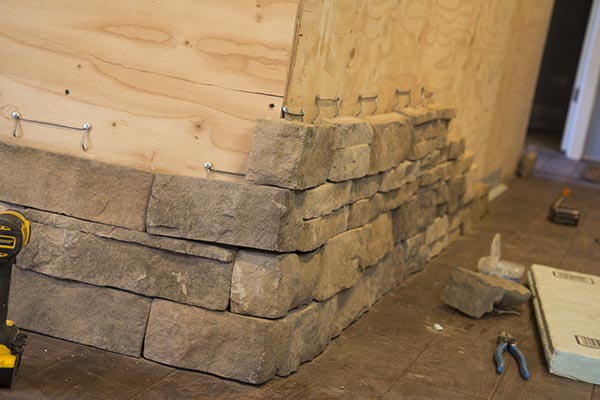
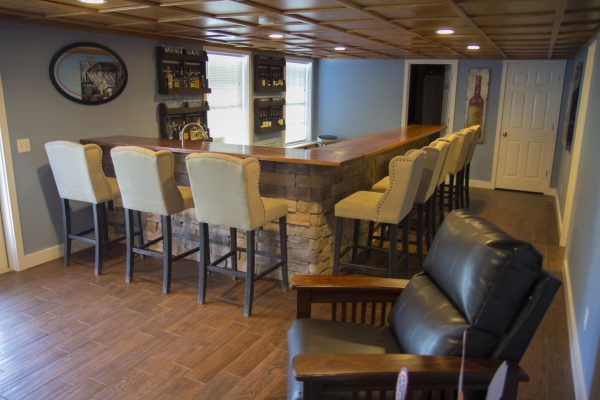
As I mentioned above getting a mason on the jobsite, especially smaller projects that don’t require a large amount of work, is often times difficult at best here in the North-East. So I was very interested in trying this project to see if it’s something my carpenters could install on houses we build for customers. So I decided to use ClipStone for my newly finished basement project. I installed it for an accent wall and also for the face of my new bar. I installed approximately 300 sf of the stone using some basic tools including a cordless impact driver, wet tile saw and a small grinder.
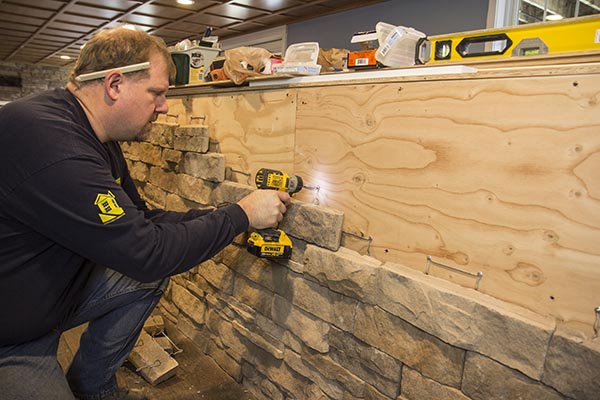
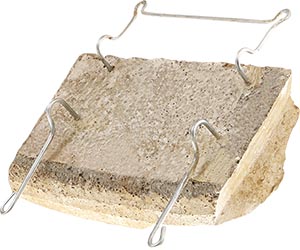
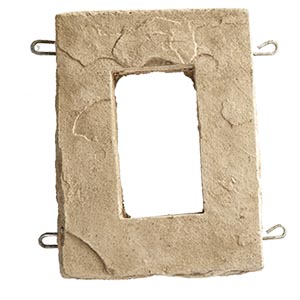
As you can see from the photo, the embedded wire is designed to keep the stone out away from the wall to allow for drainage and air movement. The wire is flexible enough that you can bend it slightly if a fastener needs to be moved. In the image of the back of the stone, the lower “single” leg wire loops fit behind the previously installed lower course of stones, and screws are installed in the upper “loops” of the wire.
ClipStone recommends a minimum 1-1/4″ long #8 galvanized waffle head screw. I used 1-1/2″ long stainless steel waffle head screws used for installing wire lathe. The flat backside of these screws holds well and doesn’t pull through the wire loop like a more traditional wood or drywall screw.
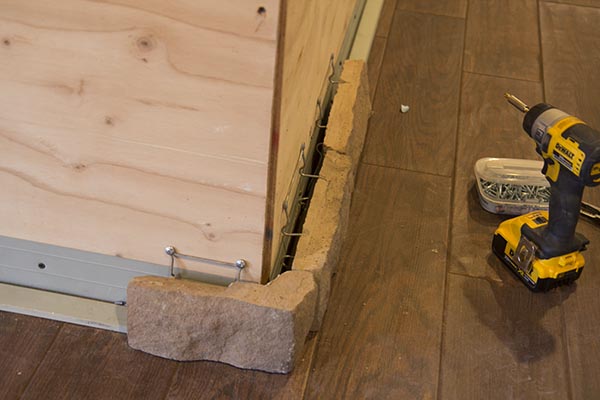
The first course of stone starts on a special starter strip that resembles starter strip for vinyl siding. The starter strip helps lock in the bottom wire and also allows the first course to be kept up a bit in exterior applications to allow breathing room. For detailed instructions on how to install ClipStone they offer a very useful installation guide.
Each of the stones can be easily cut with a wet saw or grinder to adjust the length. Cutting the stones is required at the ends of a run where the stone meets another wall or change in materials. One tip I would suggest is trying to avoid cutting any of the stones in the middle of a run as it will lose it’s natural appearance. If a stone needs to be cut in the middle of a run, try to mimic the angled ends so the stones overlap correctly.
Overall, the installation of ClipStone is very easy. In fact, I’d say it’s a DIY project that most people who are comfortable with basic power tools can accomplish. The nice thing is you can always unscrew the blocks and start a row over if you’re not happy with the appearance. There is absolutely no mortar required so the only mess is dust from cutting the stones.
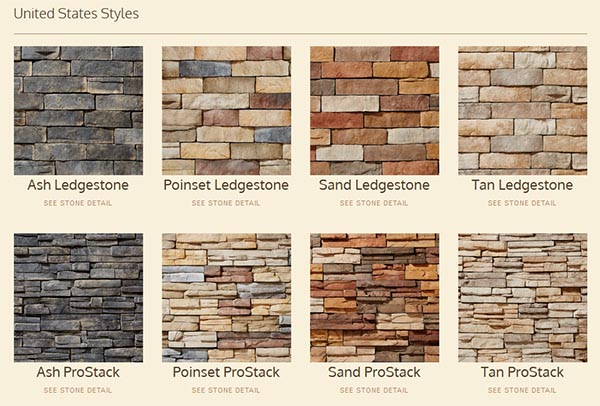
ClipStone offers eight color/styles here in the US (another 8 styles in Canada) including two stone styles (Ledgestone and ProStack) with each style featuring four colors (Ash, Poinset, Sand and Tan). Because the stones are all the same size you can even mix colors/styles to create your own unique look. Each of the four colors also offers the specialty pieces mentioned above.
ClipStone is a beautiful stone veneer that’s easy to install and offers many different styles and features. This is definitely a great option for contractors and home owners that either can’t find a local mason or can’t afford the cost of traditional stone masonry. This mortarless stone veneer is designed to work well with drainage planes to prevent water damage to the substrate. It can be used for both interior and exterior applications and best of all it’s fast to install compared to traditional masonry. If you’re interested in this product check out their website and click on the “Contact” menu to find a dealer near you. I absolutely love how our finished basement turned out especially my new bar!
Which is Better a Stick Nailer or Coil Nailer? Framers have many choices in nailers…
Estimating How Many Nails for a New Roof When it comes to estimating materials for…
Composite / PVC Decking Layout Tips and Advice Composite and PVC decking have really changed…
Benefits of ERV Systems (Energy Recovery Ventilator) If you're building a new home or doing…
Vermiculite Attic Insulation If your home was built before 1990 there is a chance it…
Arc Fault (AFCI) Circuit Breakers Tripping Often An arc-fault circuit interrupter (AFCI) or arc-fault detection…
View Comments
Thanks Todd!
Great website!
Hi.
We are getting ready to build a new house, with brick and stone exterior siding. Can you tell me the difference in cost between brick and clipstone?
Thanks!
Tim
Really hard to say, you'd need to get a quote on both. My gut tells me that a product like ClipStone will be quite a bit cheaper.
Hello Todd. I'm currently installing the clip stone product on my fireplace. I have purchased the supports and mantle for clip stone, however, I cannot find anyone on the web that has installed one or can even come close as to how to even start. I need direction on this matter as it has me stumped
What are you stumped on? Feel free to email me
todd "at" frontstepsmedia "dot" com
Can the clip stone product be used to encase 6x6 post on a pergola ?
Sure....you'd have to adjust the overall outside dimensions of the post to work with the standard corner sizes.
Tod, I`m building a sauna. I would like to use clip stone behind the wood stove. Can I use plywood, then cement board, then screw on clip stone? Thanks. Joe
Yes sir! Just need screws that can easily penetrate the cement board and bite into the plywood
Hello i am looking for something to go around a 4x8 pillar. Could i make this work using clipstones?.
Probably...but you may need to pad out the column dimensions so it will work with even number of corner stones.
Todd, I want to use this on my fireplace however it has obtuse angles on each side, do I just miter the corners? The premade right angles will not work,
Thanks
Not sure how that will work...i'd reach out to them and inquire.
Hello Todd
I am about to install a wood stove in my house and would like to use clip stone on the wall. What is the proper method to install clipstone so there is no fire hazard.
I have removed the dry wall in the area
Thanks
Hi, In northern Maine, Can clip stone be used outside as sliding in areas that have snow build up against sliding? Any issues with that?
Also can it be used as a non combustible behind a wood burner inside?
Thanks
I don't see any issues with the snow...just be sure you have a proper water proof membrane behind it and your follow the directions. I think it's fine behind a wood stove...again the backing is important..i would install some sort of cement board behind it.
Any comments/suggestions/concerns on the suitability of using the ClipStone product with a exterior, concrete block wall (substrate)? So doubt the fastening process is a little more tedious than attaching to lumber frame? ...
Should be fine.