

How To Replace Taco 0014-F1 Circulator Pump Cartridge

Replacing Taco 0014-F1 Cartridge
I like to try and fix things myself when they are easy and straight forward. Typically I’ll do some research and determine if a home repair is something I can tackle myself or if it’s time to call a PRO. Being a contractor myself I find myself hating to pay top dollar if the task at hand is just some basic labor involved. Recently I was noticing an issue with the main circulator pump on our hot water heating system and did some research on the possible repair solutions.
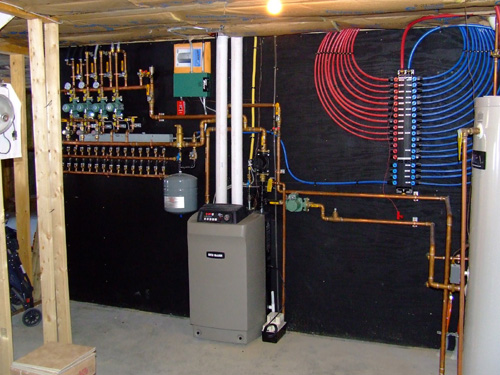
Our boiler is a propane fired Weil Mclain Ultra boiler which produces both our domestic hot water and hot water for radiant heat and baseboard heat. The system includes a main circulator pump (Taco 0014-F1 1/8 HP Cartridge Circulator Pump) and smaller circulator pumps for each of the zones. Recently I started noticing that the system was quite loud when running and further investigation I determined the main circulator pump was very loud. These pumps are typically very quiet where it’s hard to know if they are even running.
With the system being approximately 13 years old and doing online research I found that most of these pumps wear out in the impeller / bearing assembly. Further research shows that on this model that assembly is contained within a replaceable cartridge. With a little more research I discovered that the cartridge is extremely easy to replace and only take a few minutes and a couple basic tools.
Step 1 – Cut Power
Obviously the first step in any repair to an electronic component is cutting all the power to the device. Most boilers/furnaces have a kill switch located near them that cuts all power to the system. I shut that off as it cuts all power to both the boiler and all the circulator pumps. If you’re not sure you can also cut power at your main circuit breaker panel.
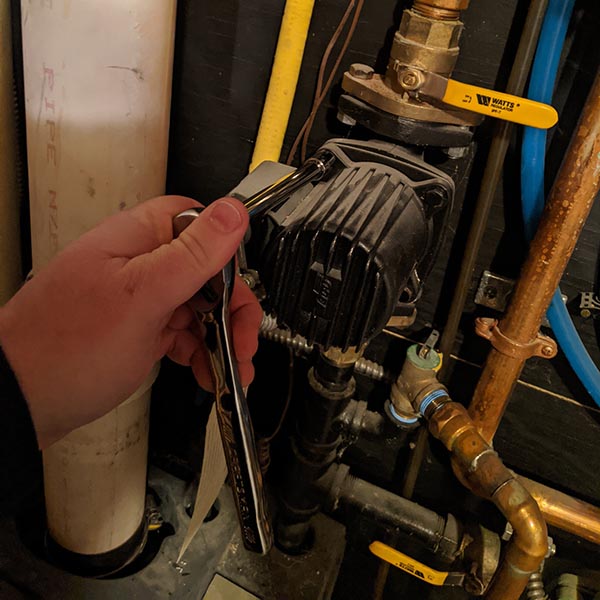
Step 2 – Isolate the Pump
The first step in this process is isolating the pump so all the water in your heating system isn’t drained out. Now this is going to be really easy if the original installer did a good job on your install (here’s the difference between a cheap job and a job done right). Most good installations include a shut-off valve on both sides of the pump so that the pump can be serviced or replaced without draining the entire system.

In the picture above you can see the top valve closed (when the valve is open the handle should run along the length of the pipe, and when closed it should be perpendicular to the pipe, the handle turns 90 degrees). You can’t see the bottom valve but it’s closed as well (handle removed and used on the upper valve, no idea where the handle went!).
By closing both valves the only water that will escape during the repair will be the small amount located within the pumps and piping between the two valves.
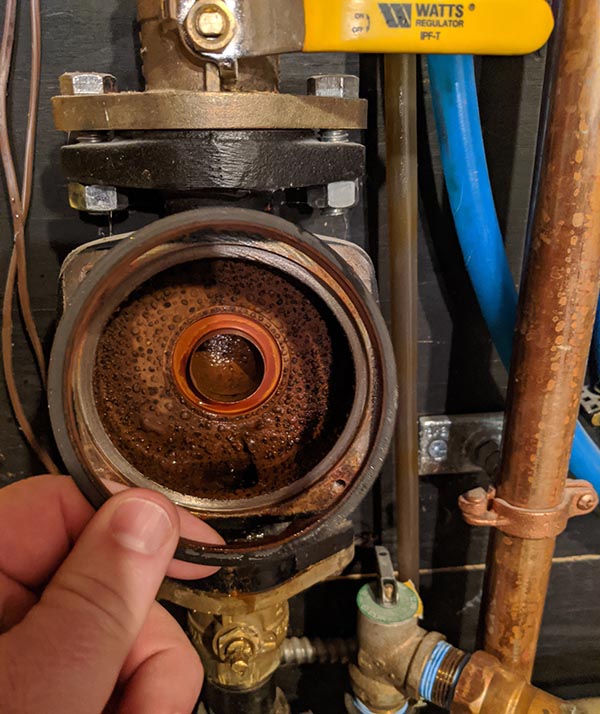
Step 3 – Remove the Motor Housing
Most Taco cartridge circulator pumps are similar so these instructions likely apply to many different models. The next step is really easy, using a socket (in this case, you may need an Allen wrench on some models) 4 bolts need to be removed that hold the motor housing to the main body of the pump assembly. As you can see in the picture above, the 4 bolts are located around the outer edges of the motor housing.

Slowly pull the motor housing off the pump housing. The water that’s inside the pump will leak out so take care not to get water into the motor housing itself. One of two things is going to happen here, either that impeller cartridge is going to stay with the motor or in my case the cartridge stayed attached to the pump housing. In either case you’ll need to likely pull at it to release it from either side. You should be left with 3 pieces, the motor housing, the cartridge and a flat metal plate that holds the cartridge in place.
Step 4 – Replace Gasket
When you order a Taco replacement cartridge (for this pump I ordered part number TAC0014-004RP) it comes with the cartridge, 4 new bolts, and a replacement gasket. As you can see above there’s a large rubber gasket that fits into a machined slot in the pump housing (shiny round surface in the background). Simply pull out the old gasket and install the new one, it will likely fit loosely but should stay in place long enough to re-assemble the pump.

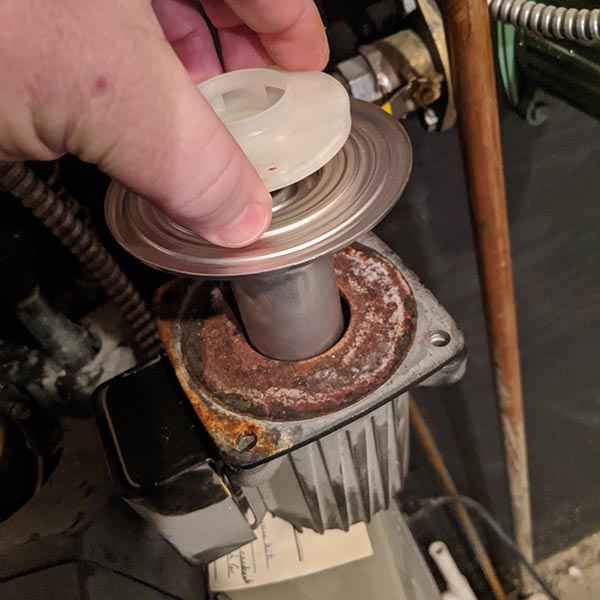
Step 5 – Insert the New Impeller Cartridge
Above you can see both the new and old impeller cartridges. There are completely self contained units that simply slide into the motor housing. The rubber gasket seals the impellers into the pump housing and keeps the water from entering the motor housing, it’s a really simple and elegant design in my mind! The flat plate should sit on top of the motor housing, then slide the new cartridge into the motor housing.
Step 6 – Bolt Motor Housing to Pump Housing
The next step is bolting the motor housing / cartridge assembly to the pump housing with 4 bolts. The kit comes with 4 new bolts so I’d recommend using the new bolts. The important step here is to finger tighten all 4 bolts, then tighten the bolts a little each around in a circle until they are all tight. This prevents the gasket from getting pinched on one side and not sealing properly. Think of it like tightening lug nuts on a car.
Final Step – Testing
The final step is turning the system on and testing to be sure there are no leaks. First you’ll need to open both valves back up and let water enter the pump. Next turn the power back on to the system (boiler and pumps). Then turn up your thermostat so the system is calling for hot water and turns on the main circulator pump. I let it run for about 30 minutes to be sure there were no leaks. The best part was HOW QUIET it was! There’s something really satisfying about fixing simple things yourself. The new cartridge cost $155 compared to over $300 for a new pump and a $90/hr charge from my plumber. Figure I probably saved $250 or more fixing this myself. While I don’t think all boiler repairs should be done as a DIY project I do think with a little research there are repairs you can make yourself and save some big money.


Leave a comment