

How To Install A Wall Safe

Installing a Biometric Wall Safe
 Many home owners choose to buy safes for their home to protect valuable jewelry, documents and even guns. One of the more popular choices today are the biometric wall safes. Installing a safe in the wall provides extra security and takes up very little room. In addition, the cost of biometric technology is really affordable now which means no more forgetting a safe combination.
In this article I’ll show you how easy it is to install a wall mounted biometric safe in your home. With a few simple tools and about an hour of time you can install one.
Type of Wall Safe
Choosing a wall safe can seem confusing to some but it really isn’t all that hard. There are several options when it comes to wall safes including ones that unlock with keys, combinations, and now biometric finger print scanners. The technology for the biometric safes is really good so I think it’s the best solution.
Biometric safes typically run on battery power (you can get some that are hard wired, but those are not really a DIY project and frankly are more suited to new construction than an after-the-fact project). They also have a back-up key lock so you can get them open if something goes wrong with the electronics. The safe I purchased also has a back-up external battery pack that can be attached to unlock the safe if the internal batteries die. So if you’re concerned about not getting a biometric safe open due to power or electronic failures that’s really not an issue.
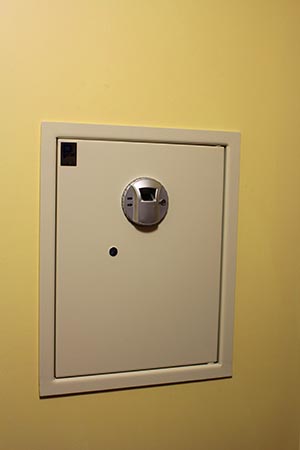
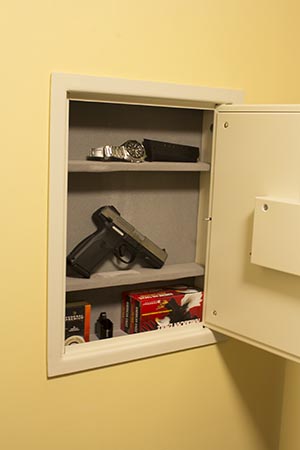
I purchased the Protex Safe Fingerprint Wall Safe” and I’m extremely pleased with how well it’s built and how well it works. More on that later.
Choose A Location
 The location for a wall safe is extremely important for a couple of reasons. First and most important the location will depend on what you’re using the safe for. If you’re storing jewelry or something valuable the safe might be best located in a room that’s not used often, or behind painting, a place that robbers might not suspect. On the other hand, if you’re storing a gun for self defense you might want it near your bedroom or near your desk in an office.
Once you’ve narrowed down a couple possible locations for your wall safe, you’ll need to do some investigation. By investigation I mean trying to determine if the wall is suitable for the safe. The last thing you want to do is try and install a wall safe in a stud bay that’s full of electrical wires or plumbing pipes.
There are several ways to do this bit of investigative work. First just take a look at either side of the wall and see if there are any outlets, switches or plumbing devices in the area. Next, look in the basement and/or attic for signs that pipes or wires are running down/up into the wall cavity in the area you’re hoping to install the wall safe. If you don’t see anything then chances are fairly good that the wall is clear.
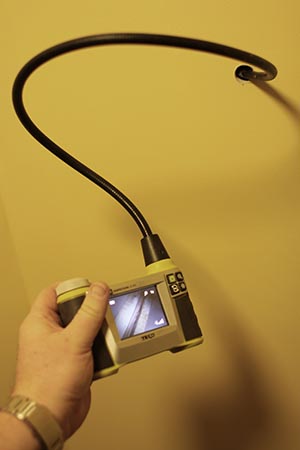
Another approach (even better) is to use a diagnostic tool. There are several tools on the market that help with this sort of thing. For this project I used two different tools, first I used a hand held wall radar scanner from DEWALT. This cool tool helped me identify the studs and whether or not there were any pipes or electrical in the wall. Then I used (you could do this instead of the scanner) a small construction inspection camera from Ryobi. I drilled a 3/8″ hole and used the camera to positively rule out any obstructions in the wall. (If I had found a problem, I’d only have to patch a small hole instead of a big one!).
TIP: If you don’t own any of these tools, and you decide to cut open the wall to investigate, be sure you carefully cut out a 4″x4″ (roughly) square hole. This will allow you to get your hand inside the wall to feel around and it’s much easier to patch a square hole instead of some random hack job.
Installing the Wall Safe
 You’ll need to gather up some tools before you install the safe. Below is a list of tools you’ll need. I’ve included must have tools along with tools that will make it much easier if you’ve got them.
- Stud Finder
- Utility Knife or Drywall Jabsaw
- Tape Measure
- Square
- Drill
- Level
- Shop Vacuum
The following tools will make things much easier and faster:
- Wall Scanner or Inspection Scope
- Oscillating Multi-Tool
- Impact Driver
You’ll have two options when it comes to installing the wall safe. The easiest option is to install the safe between two existing wall studs. Most wall safes are designed so they will fit between studs spaced at 16″ o.c. The other option (the one I chose) is to install the safe where an existing stud is located. I did this to center the safe on a wall, but it’s not always necessary. The following steps assume the safe is installed between studs. I’ll put some notes at the end about installing at a stud location.
 The first step is to use a stud finder to locate the wall studs. I recommend taking several readings at different heights so you can get a reliable reading from the stud finder. Mark two adjacent studs where you’ll be installing the wall safe.
- Using a utility knife or drywall jabsaw cut a small 4″x4″ square hole in the center of the stud bay. This gives you one last chance to be sure there’s nothing in the wall that would interfere with the safe. It also allows you to find the exact location of the studs.
- Layout the size of the hole needed to install the safe. Some safes come with a template, but all you need to do is measure the back of the safe and add about 1/4″ to the height. Use a pencil, tape measure, and square to draw a rectangle that represents the hole. The sides should be laid out to the edge of the studs.
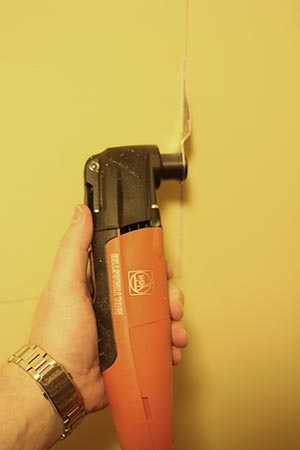
- Cut out the remaining rectangle using a utility knife or drywall jabsaw (an oscillating multi-tool is perfect for this job, and MUCH faster!). Remove the piece of drywall and dispose of it (Tip: If you don’t have access to scraps of drywall, you might want to safe this one in a dry place in case you ever need to make a patch in the house.)
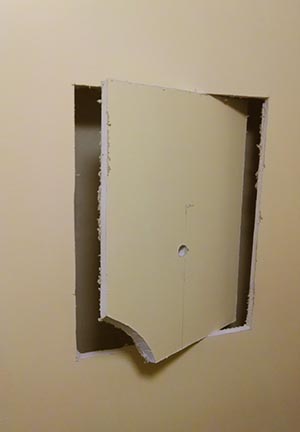
- Try sliding the wall safe into the hole that you just cut out. If it’s tight then you’ll need to cut the opening a bit wider/taller. Do not try to hit it into the hole with force as you may damage the wall and/or pop screws.
- Once the safe fits follow the directions for attaching it to the studs. Before you attach the fasteners be sure to use a level and get the safe as level as possible, this will help the door open properly. The safe I purchased came with six 1/4″ lag screws and washers. You can use a socket to install them but it’s LOTS faster if you use a impact driver!
- Finally test the door to be sure it opens and closes smoothly. Don’t forget to vacuum up the drywall dust as soon as you can, if you don’t you’ll be finding it all over the house for months to come.
 Alternate Installation if you Need To Cut a Stud
If you need to cut a stud like I did then you’ll need to take on additional step. I used my FEIN MultiMaster to cut the stud and remove it from the wall. By using the tool carefully you can cut the stud through without cutting the drywall on the backside of the wall. Once you remove the stud you’ll need to install 2x framing on either side of the hole so the safe can be attached. Cut 2x studs about 20% longer than the hole and insert them between the two layers of drywall. Secure them with drywall screws as close to the hole edge as you can. This way you won’t have to mud them as the safe flange will likely cover them up. If you don’t install the additional framing around the hole perimeter the safe can easily be torn out of the wall.


Leave a comment