

Outdoor Fire Pit and Patio

Our Backyard Fire Pit, Patio & Sitting Wall
Enough of the technical stuff right? Our project was lots of fun and the results are way above and beyond my wildest expectations. The features of our project include the following:
Patio – Cambridge with ArmorTec®
Our selection of materials started with the patio. Our landscaper recommended Cambridge with ArmorTec® because of it’s superior wear performance on projects they have installed over the years. With a solid recommendation like that there was little discussion on the pavers to use. We selected the Ledgestone XL random pattern in the Sahara/Chestnut color. The soldier course was made using Techo-Bloc Victorien Pavers in Onyx Black.
Note: You can see the top of the four precast concrete piers at the corners of the patio. The pavilion will end up covering those pier caps resulting in a seamless look.
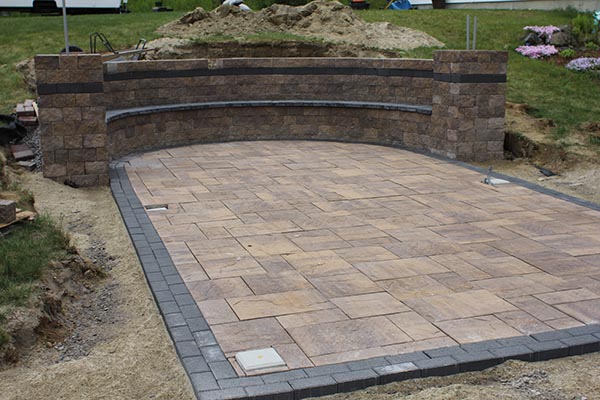
Cambridge Ledgestone XL Pavers
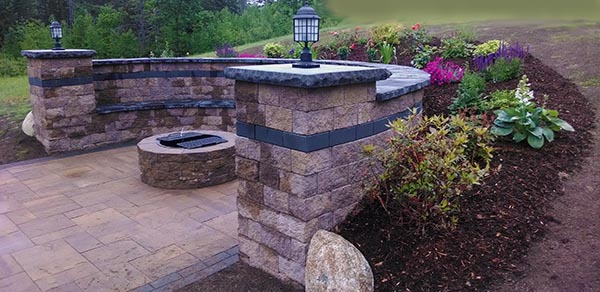
Sitting Wall and Columns with Cambridge MaytRx®
 The sitting wall (retaining wall) and columns are certainly the highlight of this project. The columns and walls were built using Cambridge MaytRx® wall blocks in the same Sahara/Chestnut color. The blocks are specifically designed for building both straight and curved walls.
We were able to create the curved walls with these blocks but this is the one area of the project that added considerably more time and money due to the difficulty in creating a custom radius using the blocks as is without trimming them. Because of the height of the wall, it was reinforced using a special geo-grid that ties the blocks to the backfill which ultimately creates a much stronger wall section.
In one of the photos above you can see that the sitting wall was built using two independent walls, one in front of the other. The void between walls was filled with crushed stone and compacted.
Each layer of the stone is also attached to the previous layer with a urethane based construction adhesive. The result is an exceptionally strong wall system sitting on a compacted gravel base that’s sure to last for years to come.
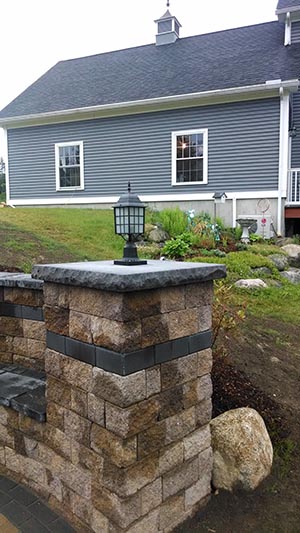
Wall Caps and Accents
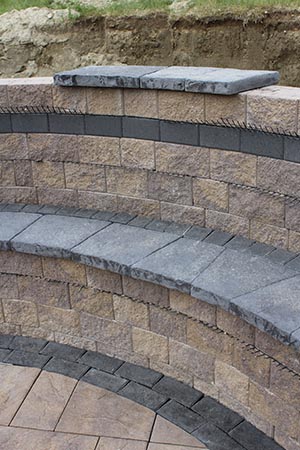 The walls and columns were capped with Techo-Bloc Stonedge cap stones in the Onyx Black. We opted to use the Techo-Bloc products for a couple of reasons.
- The Cambridge line didn’t offer cap stones large enough to cover the columns.
- We wanted to match the accent borders and caps, which Techo-Bloc offered all three products.
- Tech0-Bloc offered darker caps stone colors which we wanted to help create more contrast in the design.
One of my favorite design details on this project is the matching accent band around the walls and columns. Our landscaper came up with this detail and I think it really helps dress up the neutral colors of the walls and columns. Huge hat tip to Jim Andersen on that idea!
The column cap stones are topped off with lamp post fixtures. I was able to order matching pier cap mounts for the lights which allowed us to easily attach the lights to the top of the stones. Each cap stone was cored using a 3″ diameter concrete core bit to allow the electrical conduit to run up into the base of the fixtures. Conduit was installed from the house over to one of the foundation piers and then back over to the lights. This will allow us to install a switch for the lights on one of the pavilion columns.
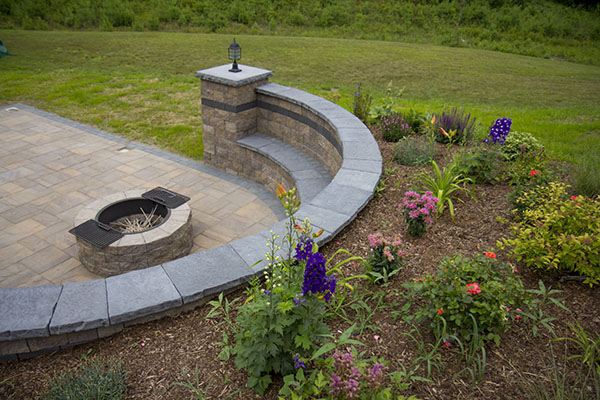
Fire Pit – Cambridge Fire Pit Kit
The fire pit itself was the easiest part of the project. That’s because Cambridge sells it in a kit to match the wall stones. The kit takes about 30 minutes to assemble and you’re ready for a fire! The kit comes with a steel insert ring and a folding grill. The bottom of the ring is filled with sand to help prevent damage to the pavers below and stop leaching of the ash after rain. These kits are certainly a great DIY project for the backyard if you’ve got a simple patio or just a pit on the back lawn!
Landscaping
To finish things off we decided to create a flower garden around the back of the sitting wall. The garden is filled with perennials that create a beautiful backdrop to the rugged looking stonework. The entire patio, walls and fire pit create a very unique landscaping feature in our yard now. The creative design allowed us to carve into the side of a slope resulting in more useable space and an interesting feature.
Great Job by JCB Designscapes
I wanted to quickly thank the entire crew from JCB Designscapes along with owner Jim Andersen for helping make this crazy project come to life. He and his crew did an amazing job and they are truly a talented bunch of guys. If you live in the Lake Sunapee Region of New Hampshire I highly recommend them!


Leave a comment