

Thin Rip Table Saw Jig

How To Make A Thin Rip Jig
Cutting thin strips on the table saw can be quite dangerous and difficult to get precise repetition. One of the approaches to cut thin strips safer is to use a thin rip jig. There are lots of jigs you can buy for this purpose and also lots of designs for building them yourself. This particular design isn’t unique by any means, it’s actually inspired by the Woodsmith version.
Free SketchUp Model – Thin Rip Jig
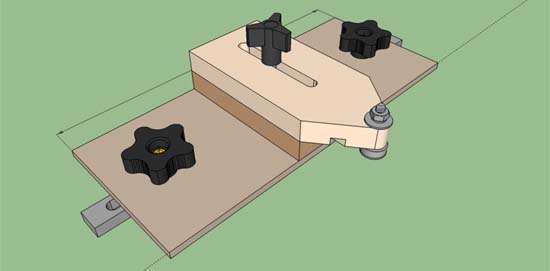
For all of you SketchUp users I created a 3D model of the thin rip jig that I built. You can download the model HERE. The model can allow you to view it in 3D which is pretty useful.
Materials Needed To Build Thin Rip Jig
Quite a bit of this jig is built using scrap wood I had in the shop. However, I did buy some parts that I’ll list in this section in case you’d like to order them from the same resources. I used the following parts:
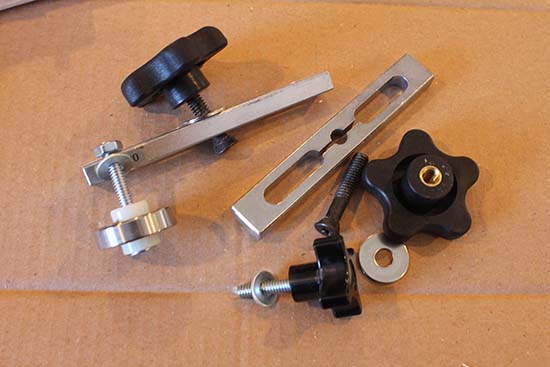
- R10-2RS Sealed Bearing
- Nylon Bushing
- Miter Slot Hardware
- Jig Hardware Kit (4 Star Knob) This kit is really useful with jigs. I used the 4 Star Knob from the kit along with a T-Nut.
The base of this jig is a piece of 1/4″ Birch plywood. The two upper pieces are made from 3/4″ Birch plywood and the runners are pieces of Walnut (any hardwood would work well). You’ll also need some wood glue, some small wood screws, and a 1/4″ bolt, nuts and washers to hold the bearing.
Building The Thin Rip Jig
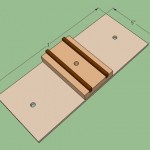
This jig is comprised of three basic wood pieces; the base, sub-base and top. As I mentioned earlier, the base is simply a piece of 1/4″ plywood that the miter bars are attached to and the sub-base and top sit on. This could be easily modified so that the sub-base is wider so that the miter bars can be attached to it. The sub-base gets screwed to the base and has two guide bars on it that support the top roller assembly.
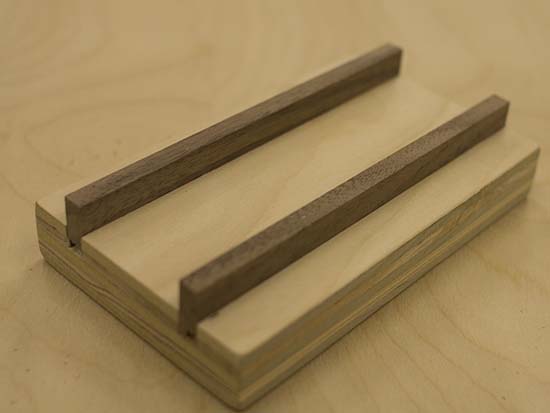
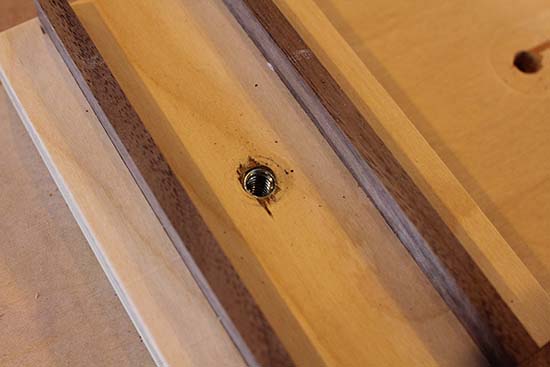
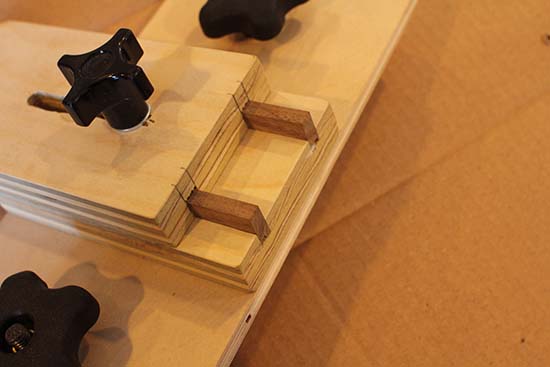
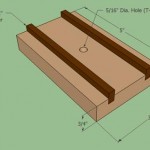
The picture above shows the sub-base made from 3/4″ Birch plywood. The sub-base is 3″ wide and 5″ long. I cut 1/4″, 1/4″ deep dado’s and then glued 1/4″ wide by 1/2″ tall pieces of Walnut into the slots. In the center of the sub-base I drilled a 5/16″ hole and installed a 1/4″ T-nut from the back side (the T-nuts come in the jig kit I mentioned above).
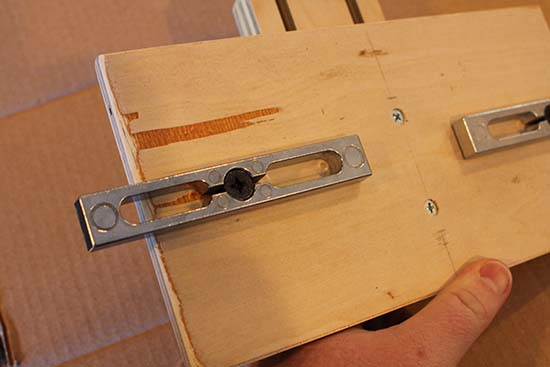
 Next the sub-base is attached to the 1/4″ plywood base (5″ wide by 12″ long). Attach the base to the sub-base with a couple of 3/4″ wood screws in counter-sunk holes. Two holes (5/16″ dia.) are also drilled in the base to attach the miter slot bars.
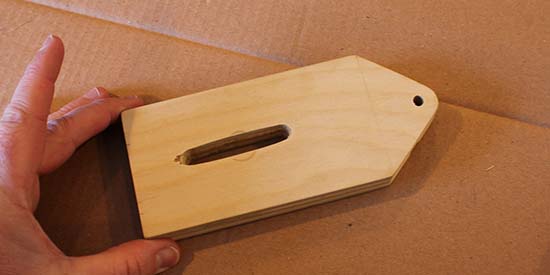
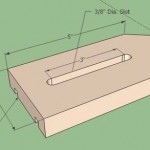
The top of the jig is made from a piece of 3/4″ thick Birch plywood. The rectangular portion is again 3″ wide and 5″ long and the “nose” for the roller is another 3″ for a total length of approximately 8″. The tip of the “nose” has a 1″ dia. radius which I cut out using my band saw.
At the center of the “nose” radius I drilled a 5/16″ hole for the bolt. In addition, on the bottom side of the top I drilled a 7/8″ dia. by 1/4″ deep hole so the nylon bushing had a place to “seat” itself.
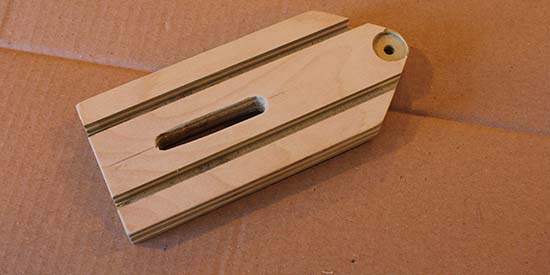
On the bottom of the top I cut two matching dado’s that line up with the Walnut runners from the sub-base. Be sure to test the piece to ensure the top and sub-base mate properly and slide easily. I applied some paste wax to both surfaces to help them slide more easily as well.
The last step in making the top piece is cutting a slot for the 4 star knob/bolt to attach to the sub-base T-nut. The slot is 3/8″ wide and 3-1/2″ long. I cut the slot by drilling multiple holes with the drill press. If I build another one of these jigs I’ll use a router bit for a straighter, smoother slot.
Note: When you buy a bearing like the one I used for this jig it will need some sort of bushing to isolate it from the bolt and allow it to spin freely. I included a link to a bushing that will work with that bearing. The bushing has to be pressed into the bearing which you can do using a press or even a bench vice.

I used a 1/4″ bolt, nut and washer to secure the bearing/bushing assembly to the jig. I centered the bushing on the bearing. However, I may adjust that to push the bearing down lower closer to the table saw top for thinner material.
 Using The Thin Rip Jig
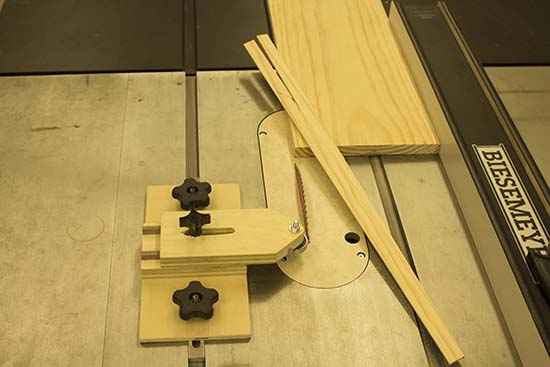
Using the thin rip jig is really easy. Before you use the thin rip jig you MUST install a zero clearance throat plate on your table saw. Without it cutting a thin strip is extremely dangerous. To set the jig up I use the following steps.
- Place the miter slot bars in the miter slot on the table saw and slide the jig until the roller is adjacent to the blade. Tighten the miter bar knobs.
- Adjust the top of the jig until the roller is the distance away from the blade that creates the thickness of the strip you’ll be cutting.
- Tighten the 4 star knob to lock the roller in place.
- Partially loosen the miter bar knobs enough so you can slide the jig back away from the blade so the roller is 2 to 3 inches in front of the blade. Be sure not to loosen the miter bar knobs too much as the jig will get loose and move from side to side changing the distance away from the blade (the thickness won’t be correct). Re-tighten the miter bar knobs to lock the jig in place.
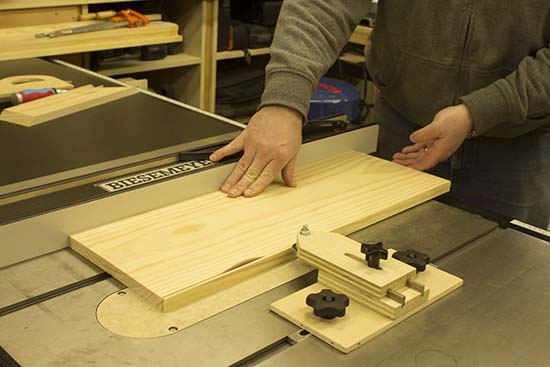
After you cut a strip, leave the thin rip jig in place. Adjust the fence so that the work piece slides over until it touches the bearing, re-tighten the fence. Simply cut another strip and continue to repeat the process for additional thin strips.


I made the Woodsmith jig also (minus the ruler) but used an old skateboard bearing because it was easier to find (free). Can’t beat a thin-rip jig’s usefulness. Much, much safer than moving the fence right up near the blade. Good work Todd.
awesome jig and instructions
Good Stuff!!!😁👍🏻
Something like this is going to be my next 3D Printed Project!!! I just finished not too long ago an “Oil Filter Cutter” which allows me to cut open a used oil filter in about 30 seconds, get out the filter material to inspect for any trapped metal particles. This should be a Fun Project to get my Creativity Flowing!!!